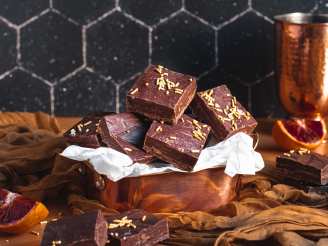
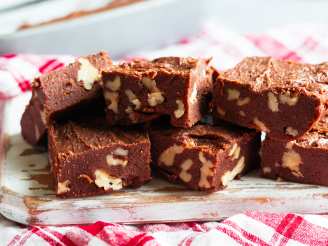
Martha's Chocolate Fudge

"I wanted my fudge to taste like what we get here in New Orleans from a place called "The Fudgery." They make it the old-fashioned way, with big copper kettles and a huge marble slab. You can still make excellent fudge without this equipment though. This is a Martha Stewart recipe for chocolate fudge with my own instructions. Follow the steps exactly and you will have smooth, creamy chocolate fudge, similar to what you'd buy at a candy store. After you've made fudge this way a few times it'll become like second nature to you; it's not really difficult at all. Martha says: "Little pieces of satin ribbon transform these squares of fudge into the tiniest of gifts." NOTE: Do not attempt to double this recipe--the results will not be the same. If you want big, thick pieces, use a loaf pan."


- Ready In:
- 55mins
- Ingredients:
- 8
- Yields:
-
32 pieces
ingredients
- 2 tablespoons unsalted butter, plus more for pan (not margarine)
- 3 tablespoons best-quality cocoa powder (Dutch process will give superior results)
- 2 cups sugar
- 2⁄3 cup whole milk (do not use reduced fat milk.)
- 3 ounces best-quality semisweet chocolate, finely chopped (baking chocolate)
- 2 tablespoons light corn syrup
- 1 teaspoon vanilla extract
- 1 cup walnut halves, cut into large pieces (optional)
directions
- You will need a candy thermometer. Make your fudge on a dry day. Too much humidity will keep the fudge from setting up properly.
- Butter an 8-by-8-by-2-inch pan and place it in the fridge. Alternately, use a loaf pan if you want really thick pieces.
- Sift cocoa powder and sugar into a medium bowl.
- Prepare an ice bath. I use my sink, filling it with approximately 2" of water, then adding a bunch of ice.
- In a small saucepan, combine milk and cocoa-powder mixture with a wooden spoon until a sandy, paste like texture forms.
- Add chocolate, butter, and corn syrup.
- Cook on med-low heat (don't let it boil yet), stirring constantly, until sugar has dissolved completely (very important), 7 to 10 minutes.
- Using a pastry brush dipped in cold water, wash down any sugar crystals that form along the sides of pan.
- Clip a candy thermometer to the side of the pan, making sure the tip of the thermometer does not touch the bottom of the pan.
- Increase heat a bit until the fudge starts to boil. When the fudge begins to boil, stop stirring and don't stir AT ALL for the rest of the cooking time or the fudge will be grainy.
- Keep the syrup boiling, being careful that it doesn't boil over.
- When the candy thermometer registers 236°, remove the pan from heat, and place in ice bath for 5 seconds.
- Transfer pan to a heat-proof surface, and let sit until thermometer registers 110°, about 45 minutes.
- Add vanilla, and using a wooden spoon (or electric hand mixer), stir fudge briskly until it thickens and begins to lose its sheen, 2 to 3 minutes (it may take a little longer to set up. Depending on the humidity in the air, it could take as much as 10 minutes).
- Stir in walnuts, if desired.
- Spread fudge into prepared pan with wooden spoon. Cover with plastic wrap; chill 30-60 minutes. Cut into 1-inch squares.
Questions & Replies

Got a question?
Share it with the community!
Reviews
-
 After failing miserably on a fudge recipe last night I wanted to attempt it again. I found this recipe and your instructions were very clear. I realized why my previous fudge completely died a terrible death. Thank you for this recipe. It turned out beautifully and omg so good! Melts in your mouth.
 -
 This is the ONLY way to make fudge. The other ways, with marshmallow fluff (yuck) or sweetened condensed milk might be quicker, but this is the one that will give you that firm piece of chocolate fudge that absolutely melts on your tongue into chocolate satin! The only difference I see in my recipe, is the ice bath. I don't use it. It may take longer to cool to the proper temp to start beating it, but I don't find it necessary. I just watch that thermometer for the correct temp. I will say the big trick in this is when you beat it and it starts to lose it sheen. You have to be quick and get it out of the saucepan and into the prepared dish, or it'll end up sticking inside the saucepan and you'll never get all of it out. But I LOVE this recipe. TRUE, traditional fudge.
 -
Great fudge!! i found that after chilling bringing the fudge back to room temp before cutting ensures a better job.
-
 I made this yesterday and I was very impressed. To be honest when I was making it, it seemed like it was just going to be okay, but it is more than okay, it is wonderful fudge, easiest fudge recipe I have ever made. Happy Holidays!!
 -
 This is great! Thank you for posting this recipe. I too have MS, so I know what you're dealing with.
see 3 more reviews
RECIPE SUBMITTED BY

MSnow
Fredericksburg, Virginia