Guava Cheesecake With Cashew-Ginger Crust

"Posting this for safekeeping, since it combines two of my favorite things -- cheesecake and guava. Adapted from "In the Sweet Kitchen" by Regan Daley. NOTES: 1. Fresh guavas are recommended for the filling, but I'm sure that canned ones would work just fine if, like me, you can't get your hands on a decent fresh guava in your area. 2. Allow at least two days to make this, because both the unbaked crust and the finished cheesecake need chilling time, preferably overnight. The unglazed cheesecake can be made up to 3 days ahead. Cook time includes chilling times."
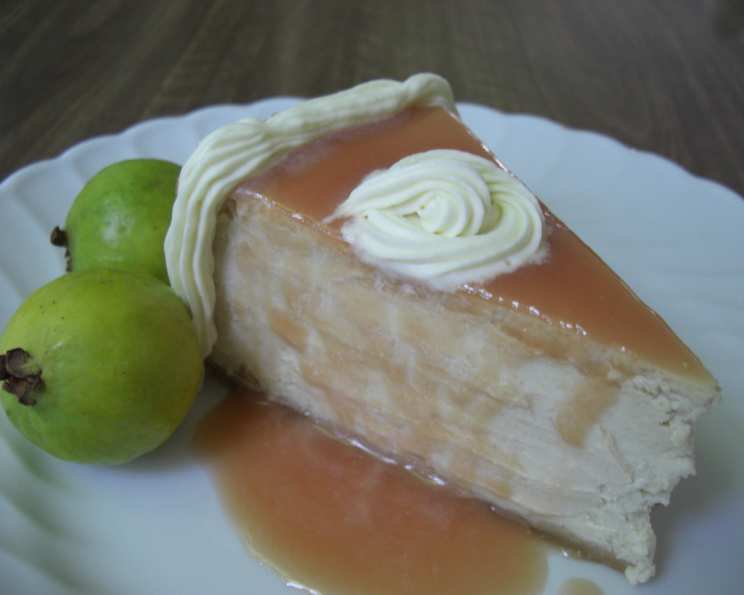
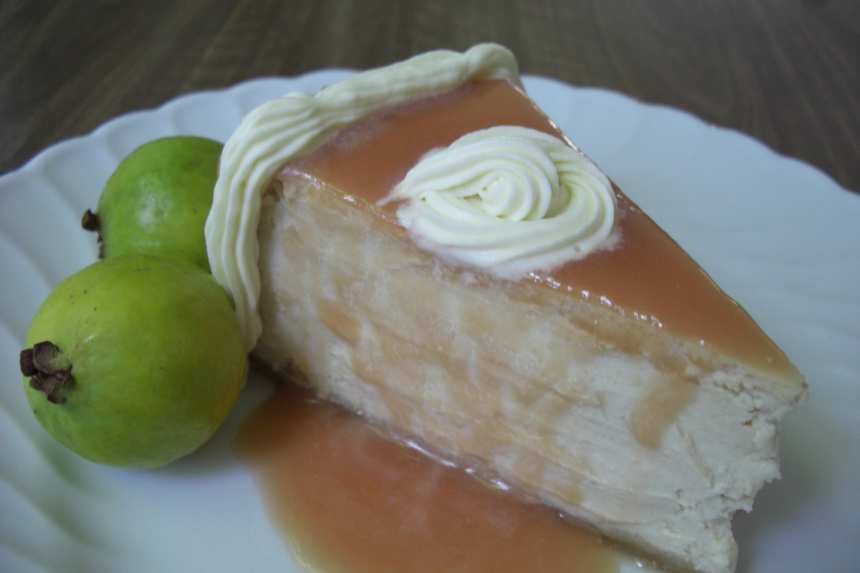
photo by Ms. Satparam

- Ready In:
- 48hrs 40mins
- Ingredients:
- 16
- Yields:
-
1 9" cheesecake
- Serves:
- 12
ingredients
-
CRUST
- 3⁄4 cup roasted unsalted cashews
- 1⁄3 cup light brown sugar, tightly packed
- 1 1⁄2 cups all-purpose flour
- 1⁄4 teaspoon salt
- 1⁄2 cup cold unsalted butter, cut into small pieces
- 1 large egg, cold and lightly beaten
- 3 tablespoons candied ginger, finely chopped
- 1 -2 teaspoon ice water (if needed)
-
FILLING
- 5 medium fresh guavas, very ripe (see note in recipe intro)
- 4 (2 lb) packages cream cheese, room temp. (Philadelphia brand recommended)
- 1 1⁄2 cups granulated sugar
- 1 1⁄2 teaspoons good-quality vanilla extract (or you can use the seeds from half a vanilla bean and reserve the pod for another use)
- 3 large eggs, room temp
- 1⁄2 cup mascarpone cheese
-
GLAZE
- 2 tablespoons good-quality guava jelly
- 1 tablespoon water
directions
- CRUST:.
- Pulse the cashews and brown sugar in the food processor until finely ground. Add the flour and salt; pulse to blend. Pulse in the butter until the largest pieces are large pea sized, then pulse in the egg and ginger. Transfer the dough into a bowl, and work the egg into the mixture until a moist, crumbly dough is formed. If the dough seems too dry, add in some ice water, up to 2 teaspoons. To prevent the dough from being tough, don't overwork it, just rub ingredients together with your fingers until everything is well-blended. Press the dough into the bottom and halfway up the sides of a 9" springform pan (keep the crust about 1/4" thick all around). Cover the pan with plastic wrap and chill the crust for at least 2 hours, or overnight.
- Once the crust is properly chilled, preheat the oven to 350 deg F. Unwrap the crust and prick it all over with a fork. Bake it until partly dried and partly firm, 15 to 25 minutes. Don't overbake at this point, because then your crust will be very overbaked once the cheesecake cooks. Set the partially cooked crust aside to cool completely before adding the filling.
- CHEESECAKE:.
- Preheat oven to 300 deg F.
- Peel the guavas with a veggie peeler, then scoop out the seeds with a spoon. Roughly chop the seeded fruit, then puree in the food processor. Another way to do this is to puree the peeled fruit in the blender, then strain the seeds out with a coarse mesh strainer. Measure out 1 cup of guava puree (set aside the remainder of the puree for another use, such as topping ice cream or mixing into a smoothie). Beat the cream cheese with an electric mixer until smooth and creamy. Gradually add the sugar and vanilla seeds (if using), and continue beating until fluffy. Add the eggs, one at a time, beating well after each addition and scraping the bowl down often. If using vanilla extract instead of the seeds, stir it in at this point. Stir in the mascarpone and guava puree.
- Pour the filling into the prepared crust. Set the pan on the middle oven rack in the center of the oven. Place a shallow pan of water on the bottom oven rack, right below the cheesecake pan (this step will help to prevent cracking). Bake for 1 3/4 to 2 hours, or until edges are set but center is slightly wobbly. The edges should be lightly colored, and may have a bit of cracking. As soon as the cheesecake is out of the oven, run a thin-bladed knife around the edge of the cheesecake to loosen it from the edge of the pan (this also helps to prevent or minimize cracking as the cheesecake cools). Cool the cheesecake for 1 hour on a wire rack, then thoroughly chill the cheesecake in the fridge (preferably overnight, but no less than 4 hours). Once the cheesecake is no longer warm, you can cover it. If you cover it as soon as you put it in the fridge, the cheesecake will sweat and leave little puddles of condensation on the surface.
- GLAZING:.
- Once the cheesecake is completely chilled, run a thin-bladed knife around the edge one more time, then release the edge of the springform pan. Melt the guava jelly and water in a small saucepan, then bring to a boil. Simmer glaze for about 1 minute, then pour it over the top of the chilled cheesecake. Spread to distribute the glaze, then chill glazed cheesecake for about 1 hour before serving. This keeps very well if stored in the fridge, covered with foil.
Questions & Replies

Got a question?
Share it with the community!
Reviews
-
 The best cheesecake I ever had. The recipe said 5 guavas but you will need more than that to get a cup of puree guava and some for sauce. I use Guava Nectar for the sauce and whipping cream with white chocolate for garnish. "In the sweet kitchen" by Regan Daley is my favorite cookbook :-)
RECIPE SUBMITTED BY

Muffin Goddess
Norwood, 0
<p><img src=http://i23.photobucket.com/albums/b399/susied214/permanent%20collection/untitled.jpg border=0 alt=Photobucket /><img src=http://i23.photobucket.com/albums/b399/susied214/permanent%20collection/200_artistrichardneuman-art-prints_.jpg border=0 alt=Photobucket /><img src=http://i23.photobucket.com/albums/b399/susied214/beartag_1_1.jpg border=0 alt=Photobucket /><img src=http://i23.photobucket.com/albums/b399/susied214/adopted_1_1.jpg border=0 alt=Photobucket /><img src=http://i3.photobucket.com/albums/y53/DUCHESS13/World%20Tour/ZWT2.gif alt=/ /><img src=http://i23.photobucket.com/albums/b399/susied214/projects/200_PACpic.jpg border=0 alt=Photo /><img src=http://i23.photobucket.com/albums/b399/susied214/projects/pacbanner.jpg border=0 alt=Photo /><img src=http://i3.photobucket.com/albums/y53/DUCHESS13/Zaar%20World%20Tour%203/ZWT3-Participation.gif alt=/ /><img src=http://i23.photobucket.com/albums/b399/susied214/permanent%20collection/Adopted1smp.jpg border=0 alt=Photo /><img src=http://i23.photobucket.com/albums/b399/susied214/permanent%20collection/smPACp.jpg border=0 alt=Photo /><img src=http://i23.photobucket.com/albums/b399/susied214/permanent%20collection/PAC08Main.jpg border=0 alt=Photobucket /><img src=http://i23.photobucket.com/albums/b399/susied214/permanent%20collection/adoptedspring08.jpg border=0 alt=Photobucket /><img src=http://i5.photobucket.com/albums/y164/lauralie41/cookbookswapspring08.jpg border=0 alt=Photobucket /><img src=http://i3.photobucket.com/albums/y53/DUCHESS13/Zaar%20World%20Tour%204/ZWTAB-tg.gif alt=/ /><img src=http://i304.photobucket.com/albums/nn175/allisonslattery/Banner.gif alt=/ /><img src=http://i5.photobucket.com/albums/y164/lauralie41/cookbookswapspring08-2.jpg alt=/ /><img src=http://i23.photobucket.com/albums/b399/susied214/permanent%20collection/PACfall08partic.jpg border=0 alt=Photobucket /><img src=http://i23.photobucket.com/albums/b399/susied214/permanent%20collection/IWasAdoptedfall08.jpg border=0 alt=Photobucket /><img src=http://i250.photobucket.com/albums/gg271/MrsTeny/Permanent%20Collection/PACSpring09Participation.jpg alt=/ /><img src=http://i250.photobucket.com/albums/gg271/MrsTeny/Permanent%20Collection/PACSpring09Iwasadopted.jpg alt=/ /><img src=http://i605.photobucket.com/albums/tt137/cathrineq/ZWT-TM1.jpg alt=/ /><img src=http://i23.photobucket.com/albums/b399/susied214/permanent%20collection/participantbannerzwt5.jpg border=0 alt=Photobucket /><img src=http://i80.photobucket.com/albums/j166/ZaarNicksMom/Animation6.gif alt=/ /> <br /><br /><img src=http://i80.photobucket.com/albums/j166/ZaarNicksMom/PACsticker-Adopted.jpg alt=/ /></p>
8727310"

