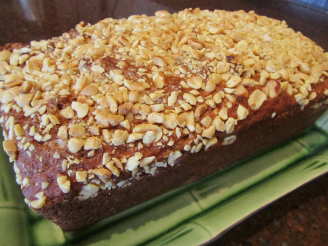
Peanut Chocolate Cake

"This recipe came from The Taste of Home Magazine. I have made a couple of very small changes to suit me. It is a very light cake and makes a very large cake. Very rich!!! TOH recommends to NOT use the fat reduces or generic brands for this cake and I fully agree!!!!"

photo by Roxanne J.R.

- Ready In:
- 50mins
- Ingredients:
- 16
- Yields:
-
1 large cake
ingredients
-
CAKE
- 1⁄2 cup butter, softened
- 2 1⁄4 cups packed light brown sugar
- 3 eggs
- 3 ounces unsweetened chocolate, melted and slightly cooled
- 2 teaspoons vanilla
- 2 1⁄4 cups all-purpose flour
- 2 teaspoons baking soda
- 1⁄2 teaspoon salt
- 1 cup sour cream
- 1 cup water
-
FROSTING
- 1 cup butter, softened
- 1 cup peanut butter
- 4 cups confectioners' sugar
- 1⁄4 cup milk
- 2 teaspoons vanilla
- 1 cup finely chopped honey roasted peanuts
directions
- CAKE: Preheat oven to 350 F.
- In a large bowl, mix butter and brown sugar.
- Beat in eggs, one at a time.
- Add chocolate and vanilla and beat well.
- Sift flour, baking soda and salt together and add to creamed mixture alternately with the sour cream.
- Gradually beat in water.
- Pour into two greased and flored 9" round baking pans.
- Bake for 35- 40 minutes, or until toothpick inserted in center comes out clean.
- Cool for 10 minutes in pan, then remove and place on wire rack to cool completely.
- FROSTING: Cream butter, peanut butter, confectioners' sugar, milk and vanilla in bowl until smooth.
- If needed for desired consistency, add 1 teaspoon of milk at a time to get the frosting you desire.
- Place bottom layer of cake on cake plate and spread top with peanut butter frosting.
- Place next layer on top and frost sides, then top of the cake with the frosting.
- (The original recipe calls for spitting the 2 layers and making 4. I leave my cake in 2 layers. I'm lazy!) Once cake is frosted, sprinkle chopped honey roasted peanuts on top or press them onto the sides of the cake.
Questions & Replies

Got a question?
Share it with the community!
Reviews
-
 MMM what a wonderful cake. The cake and icing complimented each other perfectly. I followed the recipe as is and the cake came out moist and chocolaty while the icing was surprisingly not as sweet as it looks, with a peanut butter taste which reminds me of the middle of a Reese's cup somewhat. Yummy! I did opt to leave out the finely chopped nuts as garnish cause I knew I wouldn't enjoy it like that. I also made this into a three layer cake, dividing batter evenly among my pans. I found that I did not need to add any milk to get a spreadable consistency on my frosting as well. Thanks for the recipe, it was delightful.
 -
 Pretty Darn good! Next time I think instead of adding the 1 cup water to the cake batter, I will use 1 cup cold coffee to enhance the chocolate flavor. Other than that it was great. I chopped up peanuts AND chocolate chips to press into the side to make it prettier. I like that it wasn't as heavy or dense as I thought it would be - the filling is really fluffy!
 -
 This review is based solely on the Peanut Butter Icing. I used this on the Dark and Decadent Chocolate cake. This icing is yummy! Not an overwhelming peanut butter flavour, which is nice. However, I think that I would cut back on the butter next time, it was a bit much. I also only used 3 cups of icing sugar, because I sifted it to prevent lumps. Thanks again for a great recipe!
Tweaks
-
Pretty Darn good! Next time I think instead of adding the 1 cup water to the cake batter, I will use 1 cup cold coffee to enhance the chocolate flavor. Other than that it was great. I chopped up peanuts AND chocolate chips to press into the side to make it prettier. I like that it wasn't as heavy or dense as I thought it would be - the filling is really fluffy!
RECIPE SUBMITTED BY

Jellyqueen
Repton, 39
<p>Well, in trying to make a few corrections on my about me page, I managed to delete all the banners I have had in the past. So bear with me as I try to rebuild this mistake <img src=http://i424.photobucket.com/albums/pp330/LadyBlueNose/Contest%20Banners%20-%20Feb%202010/05-1-1-1-1.jpg border=0 alt= />.<img src=http://i424.photobucket.com/albums/pp330/LadyBlueNose/Contest%20Banners%20-%20Feb%202010/beans3Participant-1.jpg alt= width=300 height=200 /><a href=http://i424.photobucket.com/albums/pp330/LadyBlueNose/Contest%20Banners%20-%20Feb%202010/beans3Participant-1.jpg><img src=http://i250.photobucket.com/albums/gg271/MrsTeny/Permanent%20Collection/Sharon123CookathonParticipationSticker.jpg alt= width=406 height=111 /></a><a href=http://smg.photobucket.com/albums/v51/tiggrr34/?action=view?t=HolidayOrnamentSwapTag2c-1-1-1.jpg target=_blank><img src=http://img.photobucket.com/albums/v51/tiggrr34/HolidayOrnamentSwapTag2c-1-1-1.jpg border=0 alt=Photobucket /> <br /><img src=http://i16.photobucket.com/albums/b2/kiwidutch/my3chefs2009final-1.jpg alt= /> <br /><img src=http://i270.photobucket.com/albums/jj81/HokiesLady65/Recipezaar%20Album/iplaytagin.jpg alt= /><img src=http://i10.photobucket.com/albums/a132/tgifford/Game%20Room%20Banners/AM%20Banners/ZaarStar-AMBanner.jpg border=0 alt=Photobucket /> <br /><br /><img src=http://i80.photobucket.com/albums/j166/ZaarNicksMom/Animation6.gif alt= /><img src=http://i80.photobucket.com/albums/j166/ZaarNicksMom/PACsticker-Adopted.jpg alt= /> <br /><img src=http://www.satsleuth.com/cooking/Swap14.JPG alt= /> <br /><img src=http://i6.photobucket.com/albums/y227/vjuhl/MEPcookathon.jpg alt= /> <br /><img src=http://i2.photobucket.com/albums/y22/dcmac/dpg11.gif alt= /></a></p>
<p> </p>