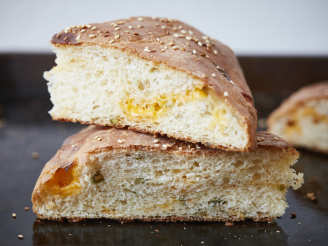
The Ultimate Cheese Bread

"This is my recreation of a kind of cheese bread that I love to get in Japan. It is SO sinfully good. You will not be disappointed. Don't let my long instructions scare you. I was just trying to be thorough in my explanation. This recipe took years to get just right so I hope you like it. Enjoy -- and happy eating!"


photo by Cooking Ventures


- Ready In:
- 2hrs 5mins
- Ingredients:
- 8
- Serves:
-
4
ingredients
- 2 1⁄4 cups all-purpose flour
- 3⁄4 cup plus 1 tsp warm water (about 105F)
- 1 1⁄2 teaspoons active dry yeast
- 1 teaspoon sugar
- 1 teaspoon table salt
- 3⁄4 tablespoon olive oil
- kosher salt, for sprinkling over the top (or sea salt)
- 7 ounces sharp cheddar cheese (preferably white cheddar)
directions
- Add 3/4 cup plus 1 tsp of warm water to a bowl. To the water, add the yeast and a small pinch of sugar. Stir to combine. Let the yeast get happy in the water for about 8 minutes.
- I normally use a KitchenAid Mixer to mix and knead the dough but you can certainly do it by hand (but kneading the dough will take longer). To the mixing bowl, add the flour, sugar, and salt. Stir to combine.
- After the yeast has bloomed for about 8 minutes, add it to the mixing bowl with the olive oil. Turn the mixer on to the lowest speed and allow the ingredients to combine – scraping down the sides of the bowl to ensure that all of the flour gets incorporated. After one minute, if the dough is a shaggy mess and hasn't formed a ball, there is not enough water in it. Just add an additional teaspoon of warm water and mix another 30 seconds on low. Depending on the humidity and time of the year, you may or may not need the additional teaspoon of water. Once the dough has formed into a fairly cohesive ball, turn off the mixer and allow the dough to rest for four minutes.
- After four minutes have elapsed, knead the dough on low speed using a dough hook for about two minutes (setting number 2 on a KitchenAid mixer). If you are kneading the dough by hand, it will take about 6 to 8 minutes. After the dough has been kneaded, form it into a smooth ball.
- Spray a medium-size bowl with cooking spray. To the bowl, add the dough and spritz the top with a little more cooking spray to keep it from drying out. Cover the bowl with plastic wrap and allow it to sit in a warm place for one hour or until the dough has doubled in size.
- After the dough has doubled in size, punch it down and cut the dough into two pieces of equal size. Form the dough into balls, cover, and allow them to rest for 10 minutes. This rest period will make it easier to roll out the dough.
- After about 10 minutes, roll each piece of dough (using a rolling pin) into an elongated oval shape about 19" long by about 4.5" wide. If the dough stretches back too much when rolling it out, as it often does for me, cover the dough and let it rest another five minutes. Invert a sheet pan or cookie sheet so that the bottom is facing up. Add a piece of parchment paper to the top of the inverted sheet pan. Next, add both ovals of dough to the parchment, side-by-side, about 1 - 2" apart. The dough should run nearly the entire length of the sheet pan. Spray a large piece of plastic wrap with cooking spray. This will keep the plastic wrap from sticking as the dough rises a second time. Place the plastic wrap on the dough – making sure that it is completely covered by the plastic wrap. Let the dough rise in a warm place for about 50 minutes.
- About 20 minutes before the dough has finished rising, preheat the oven to 325°F The rack should be in the center position.
- After the dough has finished rising for 50 minutes, uncover the dough. It should look puffy. Use your index finger to gently create little divots in the dough about 1" apart – leaving a 1/2" border around the dough untouched. This will keep the dough from rising too much in the center when it bakes. Sprinkle each oval with some kosher salt (or sea salt). Place the dough and sheet pan in the oven and bake for 25 minutes, turning the pan once during baking.
- After 25 minutes, remove the sheet pan from the oven. The bread should still be very blond in color. Because the outside edges of the dough brown faster than the inside edges, spin each piece of bread around 180 degrees so that the inside edges are now facing outward. Each oval will get 3.5 oz of cheese. Place all of the cheese in an even layer – leaving a 1/2" border around the bread. If you get the cheese too close to the edge, it'll melt over the sides. If you accidentally spill some garlic powder on the bread before you put on the cheese, I won't tell anyone. Just make sure you do not accidentally get the garlic powder on the edges of the bread or it will burn. Return the bread and sheet pan to the oven and continue baking an additional 22 to 25 minutes or until the cheese has started to brown on the edges. Slide the bread onto a wire rack and allow it to cool before eating. It's great at room temperature but can been eaten warm as well.
-
* A special note about the cheese:
- Pre-shredded cheese does NOT work in this recipe. I prefer using pre-sliced Sargento New York Sharp White Cheddar cheese, which is available in most grocery stores. It's not overly sharp and does not produce an oil slick after it melts like some cheddar cheeses can. That said, any good quality brick of sharp white cheddar will work. When using the pre-sliced Sargento, I fold over each piece of cheese so that it is double in thickness. If you are cutting the cheese yourself, make sure that each piece is about 1/8 to 1/4" thick so that it melts properly.
Questions & Replies

Got a question?
Share it with the community!
Reviews
Have any thoughts about this recipe?
Share it with the community!
RECIPE SUBMITTED BY

I love cooking. If you could see my big patootie, you'd know I love eating, too! I particularly enjoy trying new recipes and reinventing old ones. I have a cooking blog with lots of recipes and crazy stories. Check it out sometime if you're looking for a wide assortment of recipes that range from comfort foods to Mexican cuisine to sinfully rich desserts. I hope you enjoy my recipes!
Vince
Cooking Ventures
http://cookingventures.blogspot.com