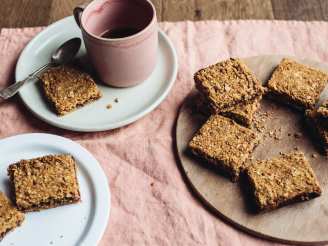
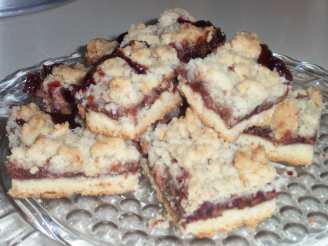
Raspberry Bars, Hindbær Snitter

"Another favorite of my daughters. She still ask for it now and then when she is home on vacation. I have not tried freezing them, but they will keep in a cookie tin with parchment paper between them for a week. Mine never lasted that long. Prep time include cooling time."


- Ready In:
- 1hr 35mins
- Ingredients:
- 9
- Yields:
-
12 bars
- Serves:
- 12
ingredients
- 14 tablespoons unsalted butter
- 300 ml powdered sugar
- 1 teaspoon vanilla sugar (not liquid)
- 600 ml all-purpose flour
- 1 egg
-
Filing
- 150 ml raspberry jam
-
Icing
- 400 ml powdered sugar
- 2 tablespoons egg whites
- 4 tablespoons candy sprinkles (optional)
directions
- In a large bowl, whisk together the flour and sugar.
- Cut the butter into small pieces and blend into the flour mixture with a pastry blender or two knives. The mixture should look like coarse crumbs.
- Transfer to a lightly floured surface placing the egg in the middle and knead the dough gently four or five times till it just comes together. Do not overwork dough.
- Place in a small bowl or a zip lock bag and in the refrigerator for1 hour.
- Preheat oven to 375 degrees F (175 degrees C) and place rack in middle of oven. Line a baking sheet with parchment paper.
- Divide dough in 2.
- Roll each piece of dough into a rectangle that is about 8 inches (22 cm) by 13 inches (32 cm) and about 1/2 inches (1.25 cm) thick.
- Place side by side on the baking sheet.
- Bake for about 20 to 25 minutes or until golden brown, the edges will be darker, that is ok.
- While still hot, trim edged with a sharp knife, cutting the darkest and uneven off.
- Transfer to a wire rack to cool.
- Prepare icing.
- Divide the raspberry jam between both cakes.
- With a sharp knife cut each cake down the middle following the longest edge and gently place the two halves on top of each other.
- (use the parchment paper to lift one onto the other).
- Ice both cakes and sprinkle with your choice of topping.
- Cut each cake into 5 or 6 bars.
- Makes about 12 bars.
Questions & Replies

Got a question?
Share it with the community!
Reviews
-
 Nice recipe....I would love it better if the ingredients were listed in the order used in the directions....just to make it more user-friendly. Instead of rolling out two separate pieces of dough, I made one large piece in a 13x9 pan, then didn't need to do Step #10 (dark edges). It worked pretty slick! I made the layers, but thought as long as I was cutting, I'd have fewer edges to get darker. Made for *PARTY 2009*
RECIPE SUBMITTED BY

My beloved sister Lise passed away on December 3 2008, so this year I didn't do all my usual Christmas cooking and baking.
Frank and I moved to a bigger apartment on January 1, and once I can see the floor for boxes, I will get back to cooking. I look forward to re-visit with my wonderful Zaar friends again.
I have not been much on Zaar last summer and Fall, due to my sister, and father's illness. We have now come to the hard part, they have stopped all treatment on Lise, and we can only try to be there for her, her family and each other. Then England seems such a long way away from Denmark.
Grown and multicultural woman with a passion for cooking and especially learning about others holidays, traditions and recipes. I have lived 18 years in the USA and have grown children there so I do go there regular. Am an accomplished mural painter and collector of Japanese art and furniture.
My DBF say I am addicted to Zaar, he is probably right, apart from having to look of idears for dinner, or lunch or snacks or chocolade dressed up as something else, I also have to check out my wonderful cooking partners in crime, and very very funny friends at Zaar. I have learned so much from you all.
<a href="http://s19.photobucket.com/albums/b161/tisht/?action=view¤t=tish2.jpg" target="_blank"><img src="http://i19.photobucket.com/albums/b161/tisht/tish2.jpg" border="0" alt="Recipezaar Challenge 2008"></a>
<img src="http://i23.photobucket.com/albums/b399/susied214/permanent%20collection/adoptedspring08.jpg" border="0" alt="Photobucket">
<img src="http://i232.photobucket.com/albums/ee177/pelysma/banner002_200.jpg">
<img src="http://i3.photobucket.com/albums/y53/DUCHESS13/Zaar%20World%20Tour%204/ZWTAB-tg.gif">
<img src="http://i3.photobucket.com/albums/y53/DUCHESS13/homepage/ZWT4-TeamCaptain.gif">
<img src="http://i195.photobucket.com/albums/z205/jubespage/stacky5.jpg">