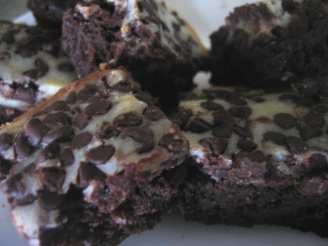
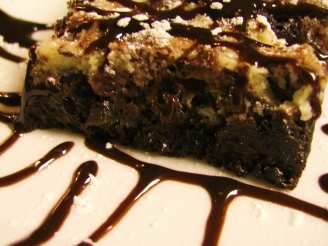
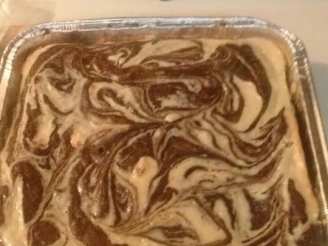
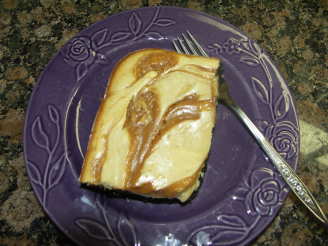
Glenda's Layered Cheesecake Brownies

"Glenda is my MIL, she has been making this recipe since the 1960's. This recipe is from scratch, no packet mix. It's best made the day before you want it. Perfect for parties and gatherings, as it is one thing you don't have to prepare the day you need it. I have written and lost this recipe twice in 10 years, I am keeping it here for safe keeping!"


- Ready In:
- 50mins
- Ingredients:
- 15
- Serves:
-
25
ingredients
- 160 g dark chocolate
- 6 tablespoons butter
- 1 1⁄2 cups white sugar
- 4 eggs
- 1 cup flour
- vanilla
- 1 cup finely chopped nuts, peanuts or 1 cup walnuts, are best
- 1 cup chocolate chips, extra (optional)
- cheesecake, topping ingredients
- 250 g cream cheese
- 4 tablespoons butter, softened
- 1⁄2 cup sugar
- 2 eggs
- 2 tablespoons flour
- vanilla
directions
- Preheat you oven to 180oC (375oF), grease a 25-35 cm brownie tin and prepare the brownie base first.
- Melt the butter and chocolate together in a glass or ceramic bowl (I use the microwave) and set aside to cool.
- In a seperate large bowl, beat the eggs until fluffy and thick, about 3 - 5 minutes.
- Gradually add the flour and sugar and continue beating.
- Add the cooled chocolate mix, vanilla and nuts - beat to combine.
- Pour all but 2 cups (this will go on top of the cheesecake layer) into the tin and set aside.
- For the cheecake layer, cream the cream cheese and butter together.
- Add the sugar and beat for a full minute.
- Add the eggs, flour and vanilla and beat to combine.
- Using a tablespoon, carefully place mounds of the cheesecake mix all over the brownie base. Don't pour it all one at once as it will sink!
- Once you have carefully placed all the cheesecake mix on top, turn over the spoon and smooth out the cheesecake layer, be sure to have it cover all the base.
- Using the same spoon, drop mounds of the brownie mix leftover on top of the cheesecake layer.
- Using a toothpick or cake tester, swirl 3 times around the pan to create a marble effect. The extra choc chips can be placed on top if you are feeling decidedly wicked.
- Bake in the prepared oven for 35-40 minutes, don't over cook.
- To test, using oven gloved hands, give the tin a little shake, the top should shake like jelly. The brownies will continue to cook and then set out of the oven.
- Place on an airer to completely cool and wait until the next day to slice and eat.
- Keep in an air tight container for upto 4 days.
Questions & Replies

Got a question?
Share it with the community!
Reviews
Have any thoughts about this recipe?
Share it with the community!
RECIPE SUBMITTED BY

<p><img src=http://i80.photobucket.com/albums/j166/ZaarNicksMom/PACsticker-Adopted.jpg alt=/ /> <br /><br />As a toddler, my nic-name was Pompom (my Poppy had a golf hat with a pompom and it was one of my first words, and it stuck as my nic name). My Poppy has long since passed, but I fondly remember him every time I log on. I'm a stay at home mum of four aged: 10, 8, 7 and almost 6. I have a severe egg allergy and am lactose intolerant, I enjoy working out ways to still enjoy food minus eggs and milk. I have been married for 14 years and have one very happy and well fed hubby.<br />My goal is to try one new recipe a week, for the past 8 years have achieved this. I own over 300 cookbooks, but no longer purchase them - but regularly print out recipes to try later.<br />When I am not cooking, I am busy household of 6 and going to the gym (to work off the wonderful calories I consumed the day before) and helping at school and church.<br />My philosophy in life is: as we have to eat, we may as well eat well.</p>