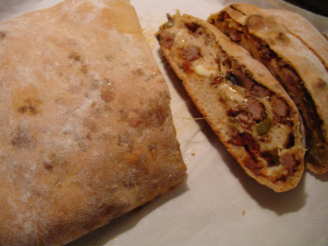
Stuffed Italian Bread (Traditional)

"There will be two versions of this recipe posted on here - one is the traditional (and being able to be planned/shopped for), and the other is the improvised (because I'm snowed in and don't have half of the ingredients) version.
This is the traditional version.
For both versions, a baking stone and wooden peal are required."


- Ready In:
- 4hrs 30mins
- Ingredients:
- 12
- Yields:
-
2 loaves
- Serves:
- 10-12
ingredients
-
Bread
- 1⁄4 ounce active dry yeast (One package)
- 1 cup warm water (105-115 degrees F)
- 2 cups warm water
- 1 tablespoon salt
- 6 -8 cups all-purpose flour
- cornmeal
- 1 teaspoon butter, melted
-
Stuffing
- 1 lb sage sausage, loose
- 1 lb mozzarella cheese (sliced or grated)
- 1 (12 ounce) can spinach (or 12 ounces of cooked spinach frozen)
- 2 tablespoons pine nuts
- 1⁄4 sweet onion
directions
- Place yeast in 1cup warmed water and let sit for 10-15 minutes until it starts to foam.
- Dissolve salt in remaining 2 cups of warm water.
- Place 5 cups of flour in a large mixing bowl. Add yeast and salt mixtures and mix well. Dough will still be wet and sticky.
- Either continue kneading the dough or place it in an electric mixer with a dough hook.
- Continue adding flour until the dough forms a kneadable mass. At this point, it will pull away from the mixing bowl or kneading surface on its own. Typically, it's another 1-3 cups of flour.
- Once the dough has a satiny sheen and pulls away from mixing/kneading surfaces easily, knead for another 10 minutes, or knead with the dough hook in the electric mixer on low-medium for about 7-8 minutes.
- Remove dough from mixing bowl and place into an oiled bowl (olive oil works the best). Flip the dough once to coat the top of the dough as well.
- Allow the dough to rise in a warm, draft-free place for about 1-1,5 hours, until dough doubles in size.
- Once dough has risen, punch it down and knead again for either 5 minutes by hand or three minutes by machine. After re-kneading the dough, separate it into two equal portions.
- If you're running low on space, place both dough balls into the same bowl (oil it again with olive oil if you don't feel it's slippery enough).
- If you have enough space, place both halves into separate bowls, both oiled with olive oil.
- Allow the dough to rise again for about an hour (doubling in size).
- While the dough is rising its second time, it's time to start the filling.
- Combine the loose sage sausage , sweet onion, and raw pine nuts into a large skillet.
- Brown sausage mixture until cooked.
- Drain excess liquid/fat.
- Once the dough has risen for its second time, remove one ball of dough at a time, and roll out flat (a rectangular shape is preferred).
- In the center of the dough, place the cheese - roughly 3" in from any edge - right in the middle of the dough. Use half of the filling for each loaf.
- After the cheese is placed, layer the cheese with 1/2 package of spinach per loaf, and again with 1/2 of the sausage per loaf.
- Once all of the stuffings are laid in place, fold over the long edges of the dough, followed with the short edges. Squeeze/roll the edges flat - this prevents leakage of the stuffing, and seals the bread shut.
- Coat the wooden peal with corn meal.
- Flip the stuffed and closed bread over, presenting the untouched side as the top. Place both loaves on the corn meal coated wooden peal.
- Let the dough rise, covered, and in a very warm place, for another 40-50 minutes.
- Preheat oven to 350 (or 325, if you have a gas oven).
- Once ovens are hot and dough has risen, use a very sharp knife to make a slit down the top of the loaves - be careful and don't slice into the stuffing!
- Brush melted butter over the tops of both loaves.
- Once the loaves have risen again (I've gotten the best results after rising loaves on top of the heating oven), place in the oven to bake for 20-50 minutes. Since ovens vary greatly, keep an eye on your bread. It only took me about 20 minutes in a gas oven, on a baking stone, heated to 350 on the dial (which was more like 375 in reality). The bread is ready when the top is a nice golden brown and the bread sounds hollow when you thump on it. The crust will be crunchy and hard. The insides will be tender and moist.
- Once bread is done, remove from oven and allow to cool for 30-40 minutes before serving.
- To serve, slice into 1/2" wide slices. It's best served warm, but can also be warmed up in the microwave at about 15 seconds per slice, or in the toaster oven at 350 for about 5-7 minutes for as many slices as you can lay flat (or you could just toast it).
Questions & Replies

Got a question?
Share it with the community!
Reviews
Have any thoughts about this recipe?
Share it with the community!
RECIPE SUBMITTED BY

I grew up in an Italian household. My father is a graduate of the Culinary Institute, and my extended family is full of incredible cooks, all of whom know old world Italian cuisine as well as any four-star chef. I learned my way around a kitchen from all of these incredibly talented people. Even though I've never been to culinary school myself, almost all of those that I've cooked for consider me one of their favorite chefs.
Ever since I was a child, cooking has been a passion of mine. I started off with simple things like omelets and tuna salad, and over the years graduated into far more complex and complicated recipes such as various marinades, brines, homemade sauces, sautees, and meals full of subtle and varied flavors, both strong and delicate.
I also love to create new dishes in the kitchen, the successes of which will be posted here. I'll also be posting a few of the old world Italian recipes I make on occasion.
Since my love of food has made my weight rather unhealthy, I've been focusing more on healthy dishes lately, and have been learning various Asian cuisines, as well as relearning cuisines I previously had developed my skills in, in order to eat far healthier, but still enjoy good food.
The cuisines that I've developed my skills with are as follows:
* Mediterranean/Italian/Greek
* Cajun
* Maryland
* General American (steaks/burgers/fried stuff/etc.)
* Tex-Mex
Cuisines that I'm still developing, but have mastered a few dishes, are as follows:
* English/Scottish/Irish
* Various Asian cuisines (Thai, Vietnamese, Japanese, Chinese)
* Caribbean
<img src="http://i80.photobucket.com/albums/j166/ZaarNicksMom/PACsticker-Adopted.jpg">