Colored Striped Icebox Cookies

"I get creative with this recipe and make the colors of the stripes according to the season/holiday. The recipe colors as written are "Christmasy". Prep time does NOT include time for dough to chill."
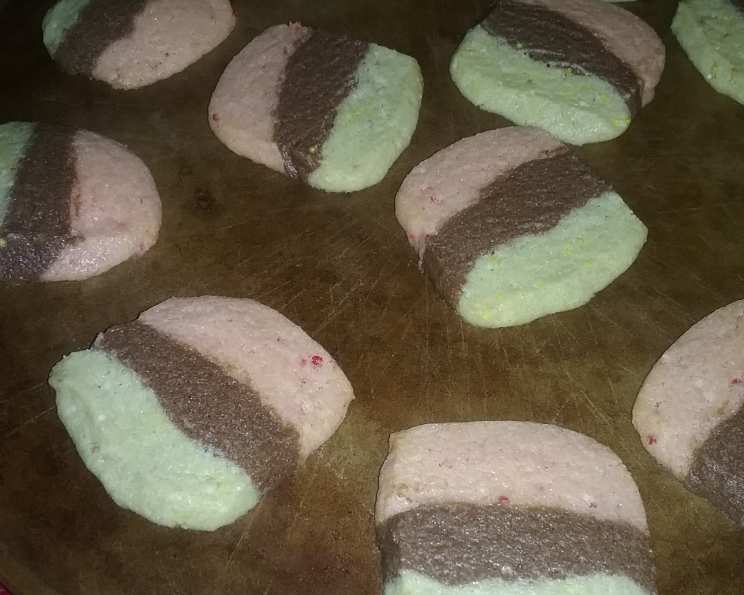
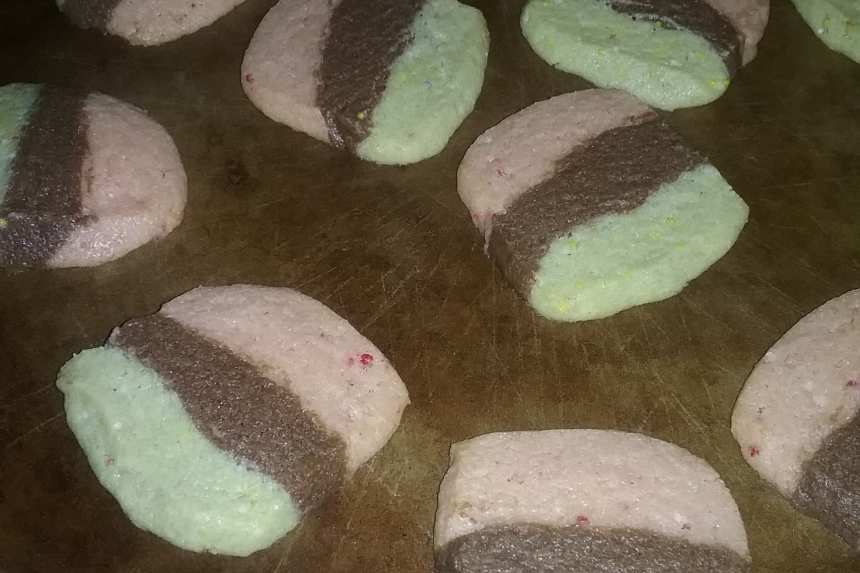
photo by TimeTraveler15


- Ready In:
- 27mins
- Ingredients:
- 11
- Serves:
-
48-56
ingredients
- 1 cup unsalted butter, softened (NO SUBSTITUTIONS)
- 1 1⁄2 cups sugar
- 1 large egg
- 2 1⁄2 cups flour
- 1 1⁄2 teaspoons baking powder
- 1⁄4 teaspoon salt
- 2 tablespoons finely crushed peppermint candies
- 1 -2 drop red food coloring
- 1 ounce semisweet chocolate, melted (1 square)
- 1 tablespoon multicolored sugar nonpareils (multicolored)
- 1 -2 drop green food coloring
directions
- Line a 9x5x3-inch loaf pan with wax paper or parchment paper (try to get most wrinkles out); set aside.
- Cream together butter and sugar in a large mixing bowl; beat in egg.
- In a separate bowl, combine flour, baking powder, and salt; gradually beat this into creamed mixture.
- Divide the dough into thirds; each in it's own small bowl.
- Add crushed mints and red food color to 1 third; mix well (may need to use hands to blend color well).
- Add melted chocolate to another third; mix well (may need to use hands).
- Add nonpareils and green food color to last third; mix well (may need to use hands).
- Spread red dough on bottom of lined loaf pan. Spread chocolate dough on top of that. Lastly, spread the green dough on top. Cover with plastic wrap and chill for at least 2 hours (or place in freezer for 1 hour).
- When chilled and firm, remove dough from pan.
- Preheat oven to 375°F.
- Lay the loaf of dough flat on a cutting board (just the way it was in the loaf pan) and use a large knife to cut dough down the middle lengthwise. Now cut each strip into 1/4" - 1/2" slices across (so each is "striped).
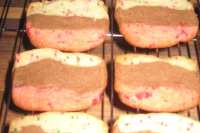
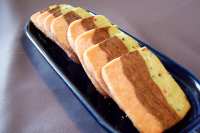
- Place slices 1" apart on lightly greased baking sheets. Bake at 375°F for 10-12 minutes or until edges just begin to brown.
Questions & Replies

-
 Whatever you chose as a user name is the name all your reviews will be under. You can change your user name in the your profile section.
 -
 I just realized that my full name appears when I do a review. I would rather have a different I.D. for this purpose. How do I change it?
Reviews
-
 Haven't actually BAKED these yet but I know they're gonna be beautiful and the dough tastes good! I'm rating now b/c I want to get down the stuff I did so I won't forget. :) Followed the instruction to the letter. Used 4 mini candy canes (easy to crush with a rolling pin in their individual packages) and 4 drops of food coloring to get the perfect pink-red that I wanted. I used 3 drops of green in the top part of the dough... which really makes the nonpareils stand out. I ended up kneading the melted chocolate into the dough (on waxed paper) b/c it was stiff. I spread the chocolate on the dough, folded one side over, pressed, and kept repeating until the chocolate was fully incorporated into the dough. I used a mixer w/ the red and green portions. I pressed each color dough out into aan appx 9x5" rectangle before putting into the paper lined loaf pan, which made it much easier to press into exact shape. I lined the pan using a trick my mother taught me about tracing the bottom of a pan onto the waxed paper using the back side of a knife. I then cut wedges out of the corners and the waxed paper fit perfectly with no wrinkles! The dough is now in the frig chilling and I will bake later today. Will return to post "taste/texture" comments. Thanks for sharing this recipe. I know we're going to enjoy the cookies! EDITED TO ADD: The cookies are baked and cooling and the only "problem" with them is staying out of them! The cookies are tender and have the most delicate blend of flavors; not too much of one... Yummmmm! These cookies are now on my permanent "have to make for Christmas" list! Thanks so much for posting this recipe, Parsley! It's fabulous!
 -
These cookies are alot of work. They had a lovely texture but found that the layer with the crushed candy canes was the only layer that had real flavour. The other two layers had bland flavour. Nice looking cookies and crisp though.
-
 I am wondering how you get 50 servings out of one loaf pan. I can't figure that out. I didn't make these yet, but I plan to. I need 7 dozen for a cookie exchange, so 2 pans should do it. Just wondering.
 -
 I made these and they are fabulous! Everyone raved how delicious they are that I will make them again this Christmas! :) Cindy
 -
 My first Icebox cookies. These come out so pretty! Not to mention addicting. I love butter cookies, but I've never had any luck rolling the dough. I'll definately be making these for The Holidays this year. Mine were perfect at 10 minutes, and to browned at 11 minutes. So watch um! I used peppermint extract since I just got it, but the next time I will use the candies! Only thing I might change is a larger layer of the chocolate dough :) But then, that's just me. Thanks Parsley!
RECIPE SUBMITTED BY
*Parsley*
United States