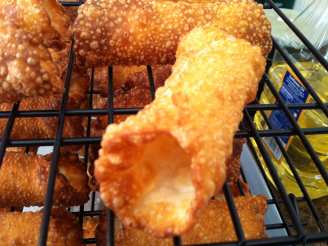
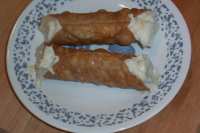
Cannoli Shells and Ricotta Cream Filling

"Giovanna, our good friend, makes wonderful cannoli shells and ricotta cream-love friends like her! Her family owned Italian restaurants for over 40 years in the Chicago area. She stores the shells in a plastic air tight container at room temperature for 2 months and freezes the filling she is not using immediately and defrosts it in the refrigerator later. As she would say mangiare, mangiare---eat, eat! (I will attempt to post some photos in the correct sequence http://www.recipezaar.com/bb/viewtopic.zsp?t=259809)"
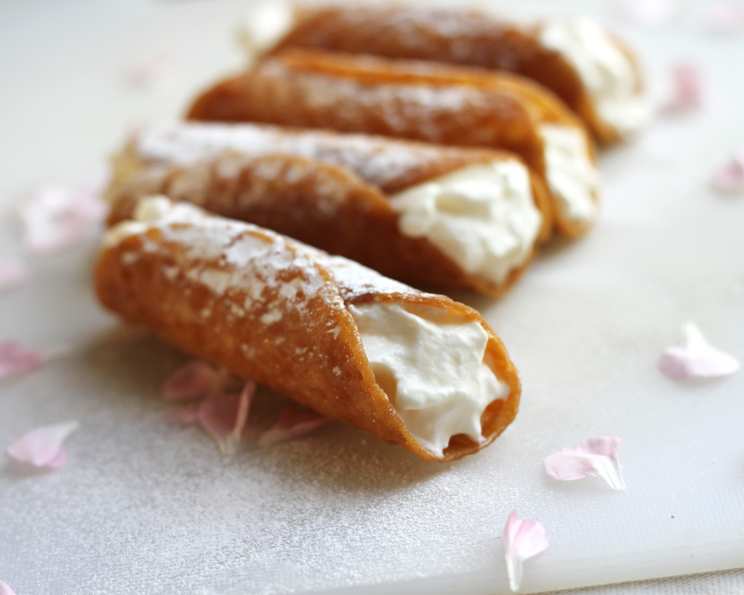
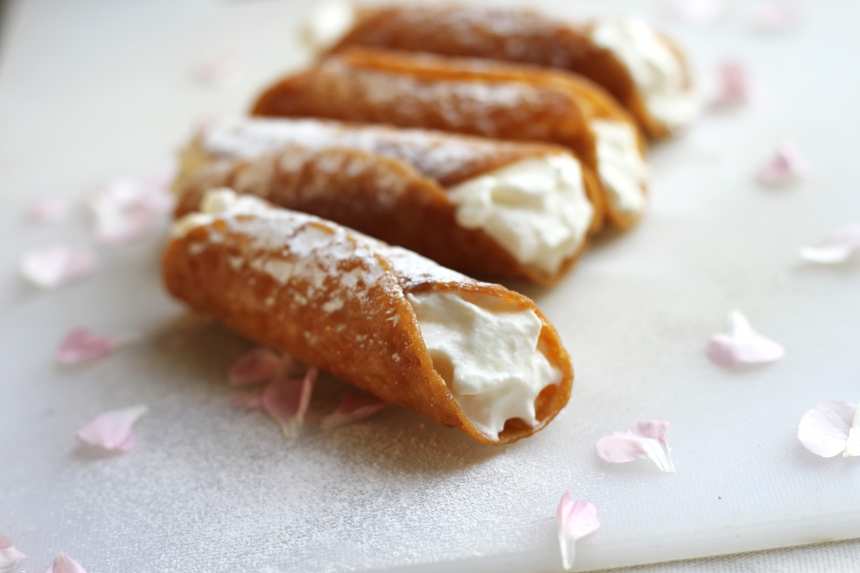
photo by Swirling F.


- Ready In:
- 4hrs
- Ingredients:
- 17
- Serves:
-
44-50
ingredients
-
For the Ricotta Cream
- 64 ounces whole milk ricotta cheese, drained
- 16 ounces powdered sugar, sifted
- 1 cup granulated sugar
- 1 teaspoon vanilla extract
- 2 -3 drops cinnamon oil
- 8 ounces bar milk chocolate candy bars with almonds (at room temperature)
-
For the Cannoli Shells
- 2 eggs, at room temperature
- 1⁄2 teaspoon vanilla extract
- 11 tablespoons ice water
- 3 cups flour
- 1⁄4 cup granulated sugar
- 1⁄4 teaspoon salt
- 1 teaspoon unsweetened cocoa powder
- 1 teaspoon ground cinnamon
- 3 tablespoons Crisco shortening
- 1 egg white, beaten
- 3 -4 quarts peanut oil
directions
- Three or more days in advance of making the cannoli shells set the ricotta in a colander inside of a large bowl.
- Scrape the ricotta into the colander and cover with plastic wrap.
- Let the ricotta drain in the refrigerator for two days, until it is dry.
- To make the dough for cannoli shells: In a small bowl put eggs.
- Beat eggs; add vanilla and ice water to eggs.
- In a large bowl, use your hands to combine the flour, sugar, salt, cocoa, and cinnamon.
- Add the shortening and mix until crumbly.
- Make well in dry mixture and add wet mixture.
- Using your hands mix together, if it is dry, add more ice water.
- Turn the dough out onto a lightly floured surface and knead until smooth and well blended, about 3 minutes.
- Shape the dough into a flattened ball.
- Cover with plastic wrap and let rest at room temperature for at least 30 to 60 minutes.
- Cut the dough into 4 pieces.
- Starting at the middle setting, run one of the pieces of dough through the rollers of a pasta machine or the dough can be rolled on a board with a rolling pin.
- Lightly dust the dough with flour as needed to keep the pieces from sticking.
- Continue to pass the dough through the machine until you reach the last or second to last setting.
- You might need to run the dough through the pasta machine three times.
- The dough needs to be thin-about the same thickness as construction paper; cut the dough into 4 1/2 inch circles. (Giovanna’s cannoli tubes are 6 inches long and 1 inch in diameter.).
- Continue rolling out the remaining dough.
- If you do not have enough cannoli tubes for all of the dough, lay the pieces of dough on sheets of plastic wrap and keep them covered until you are ready to use them.
- Put a rack in the bottom of a large heavy kettle that you plan on putting your peanut oil into so that your cannoli shells do not touch the bottom and burn. (Giovanna uses a restaurant kettle that is about 18 inches in diameter.).
- Pour about 2 inches of oil in a smaller kettle. Giovanna used 4 quarts but her kettle is huge!
- Heat oil until a deep frying thermometer shows 375 degrees.
- Oil the cannoli tubes by placing them in the hot oil then draining them in a metal bowl (you need the oil on the tube so that later the cannoli shell will slip off easily).
- Lay the dough circle flat, center the tube on it, bring left edge onto tube, dab it with egg white, bring up right side of dough circle, dab it with egg white, and roll the tube; do not press the dough. You do not want the dough to be too tight on the tube, or you will have difficulty later getting your cannoli off. Be careful not to stretch the dough or pull it tightly. Avoid, as best as possible, getting egg white on the tube, or the cannoli will stick to it.
- Repeat with the remaining dough.
- Carefully lower a few of the cannoli tubes into the hot oil. Do not crowd the pan.
- Fry the shells until golden, about 2 minutes, turning them so that they brown evenly.
- With tongs, remove the cannoli tubes, holding them straight up so that the oil flows back into the pan.
- Then drain the cannoli still on tube briefly in a metal bowl.
- While the cannoli shells are still hot, carefully slide the shells off the tubes by grasping each tube with a clean towel and gently twisting the cannoli shell off the tube with your other hand protected by an oven mitt or towel. On another work surface area, lay oilcloth or newspaper, topped with a large rack.
- When the cannoli shells are barely warm set them on top of the rack.
- It is important that the shells stay on the racks overnight.
- Repeat with the remaining dough.
- If you are reusing the cannoli tubes, let them cool before wrapping them in the dough; set aside.
- The cannoli shells can be made up to 2 months before serving if you drain them properly overnight, and store them in sealed containers in a cool, dry place, but not in a refrigerator.
- To make the ricotta cream, put the thoroughly dry ricotta in a large mixing bowl with a wire whip and blend until creamy.
- Add the confectioners’ sugar, granulated sugar, vanilla, and cinnamon oil; blend until smooth.
- Transfer to a bowl and stir in the chocolate pieces. Store the ricotta cream in the refrigerator for 48 hours. After 48 hours, serve and freeze the rest.
- Frozen ricotta cream can be defrosted in the refrigerator later.
- To assemble, use a knife to push the ricotta cream into the cannoli shell.
- Place the cannoli on a serving platter and sprinkle with confectioners’ sugar.
- Use within an hour.
Questions & Replies

Got a question?
Share it with the community!
Reviews
-
 A LOT of work to do, you have to real read the Directions very will, as have to do it over to get right. It is one for the PRO. to do to get it right way. I did it for the fun to see if I can. I loved the ricotta filling, but I added a small amount of vanilla, 1 teaspoon. And By the way, trying to make this by yourself would be a nightmare. You need an assembly line... people will work for food! I call this the Italian version of the Tamale because the whole family has to help in this process. My Pastry baking skills to me are way below the standard. But thank You for the fun we had over the days. Itis a keeper. PRMR 2013....Grpa
 -
 This was a life saver i had a dinner party italian night and couldnt find a dessert recipe everyone loved them!!!! Although i couldnt find cinnamon oil so i used a couple of shakes of ground cinnamon. ty so much!
 -
 These turned out really tasty, though I admit to not going through all of the waiting time.. I mean geez I was 9 months preggers when I made these, I couldn't wait. I halved the recipe, used butter instead of crisco and doubled the amount of chocolate. I drained the ricotta for about 4 hours and didn't let the cannoli shells rest overnight. Also I totally must have botched the cannoli shells because they came out too hard. This may be because instead of cannoli metal rings, I tried to use my rolling pin, and later the end of my metal whisk (which worked better) for shaping the cannoli shells. Because my shells were so hard, I went ahead and stuffed them all with the ricotta mixture and by the next day the cannolis were pretty perfect. The ricotta a bit more firm and the cannoli shells a bit softer. I'll definitely try this again and try to do it right next time. Thanks for posting this extensive and awesome recipe. It was perfect for satisfying that cannoli craving I had in the last weeks of my pregnancy.
Tweaks
-
These turned out really tasty, though I admit to not going through all of the waiting time.. I mean geez I was 9 months preggers when I made these, I couldn't wait. I halved the recipe, used butter instead of crisco and doubled the amount of chocolate. I drained the ricotta for about 4 hours and didn't let the cannoli shells rest overnight. Also I totally must have botched the cannoli shells because they came out too hard. This may be because instead of cannoli metal rings, I tried to use my rolling pin, and later the end of my metal whisk (which worked better) for shaping the cannoli shells. Because my shells were so hard, I went ahead and stuffed them all with the ricotta mixture and by the next day the cannolis were pretty perfect. The ricotta a bit more firm and the cannoli shells a bit softer. I'll definitely try this again and try to do it right next time. Thanks for posting this extensive and awesome recipe. It was perfect for satisfying that cannoli craving I had in the last weeks of my pregnancy.
RECIPE SUBMITTED BY

WiGal
Butternut, Wisconsin