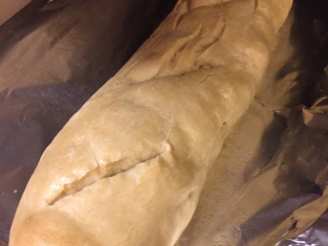
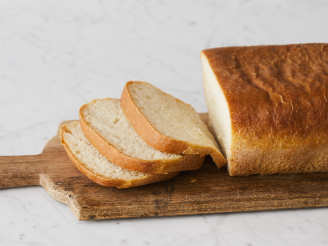
Alton Browns Basic Bread

"Like all of his recipe, this one is most excellent!"


- Ready In:
- 13hrs 30mins
- Ingredients:
- 10
- Yields:
-
1 loaf
- Serves:
- 10
ingredients
- 1 lb bread flour, plus extra for shaping
- 1 teaspoon instant fast rising yeast
- 2 teaspoons honey
- 10 ounces filtered water
- 2 teaspoons kosher salt
- 2 quarts hot water
- vegetable oil, for greasing the rising container
- 2 tablespoons cornmeal
- 1⁄3 cup water
- 1 tablespoon cornstarch
directions
- Combine 5 ounces of the flour, 1/4 teaspoon of the yeast, all of the honey, and all of the bottled water in a straight-sided container; cover loosely and refrigerate for 8 to 12 hours.
- Place the remaining 11 ounces of flour, remaining yeast, and all the salt into the bowl of a stand mixer, and add the pre-ferment from the refrigerator. Using the dough hook attachment, knead the mixture on low for 2 to 3 minutes just until it comes together. Cover the dough in the bowl with a kitchen towel and allow to rest for 20 minutes. After 20 minutes, knead the dough on medium speed for 5 to 10 minutes or until you are able to gently pull the dough into a thin sheet that light will pass through. The dough will be sticky, but not so sticky that you can't handle it.
- While the dough is kneading, pour half of the hot water into a shallow pan and place on the bottom rack of your oven.
- Grease the inside of a large straight-sided container with the vegetable oil. Place the dough ball into the container and set on the rack above the pan of water. Allow to rise until doubled in size, approximately 1 to 2 hours.
- Once the dough has doubled in size, turn it onto a counter top, lightly dust your hands with flour, and press the dough out with your knuckles; then fold 1 side in towards the middle of the mass and then the other, as if you were making a tri-fold wallet. Repeat the folding a second time. Cover the dough with a kitchen towel and allow to rest for another 10 minutes.
- Flatten dough again with your knuckles and then fold the dough in onto itself, like you are shaping something that looks like a jellyfish. Turn the dough over and squeeze the bottom together so that the top surface of the dough is smooth. Place the dough back onto the counter and begin to roll gently between your hands. Do not grab the dough but allow it to move gently back and forth between your hands, moving in a circular motion. Move the dough ball to a pizza peel or the bottom of a sheet pan that has been sprinkled with the cornmeal. Cover with the kitchen towel and allow to bench proof for 1 hour, or until you poke the dough and it quickly fills back in where you poked it.
- Place an unglazed terra cotta dish upside down into the oven and heat the oven to 400 degrees F.
- Combine the 1/3 cup of water and the cornstarch in a small bowl. Uncover the dough and brush the surface with this mixture. Gently slash the top surface of the dough ball in several places, approximately 1/3 to 1/2-inch deep. Add more of the hot water to the shallow pan if it has evaporated. Slide the bread onto the terra cotta dish in the oven and bake for 50 to 60 minutes. Once the bread has reached an internal temperature of 205 to 210 degrees F, remove to a cooling rack and allow to sit for 30 minutes before slicing.
Questions & Replies

Got a question?
Share it with the community!
Reviews
-
 This was the first time I tried your recipe and it came out perfect/ I know I will be making it a lot more in the future.
 -
 This is an excellent recipe, constructed with care and obvious appreciation of bread making. Heck, anyone can make this, and you should. This produces a supreme loaf of bread that will have your family, friends, neighbors, co/workers.....anyone and everyone to slice off "just a small piece" one after the other. I followed this exactly, because I have confidence this recipe will produce such a consistent loaf of bread.I made this on Friday, prior to Saturday lunch, and it sliced so nicely and evenly there was no need to do anything other then enjoy it. Thank you so much, Anme ~ will make this time and time again!
RECIPE SUBMITTED BY

I'm just a girl whos passion is for cooking, well some people would call it an obbsession rather.... I am a college student at RIT going for food management and prep, my favortie things! Most of my orignal recipes are made from left overs since I cook for one or two most days so there are always left overs in my house. I play mad scientist most days in my kitchen with left over chicken breasts lol. I am also a health food freak and a major gym rat, so I am always on the look out for good subs for the more unhealthy ingredients in most recipes. Also I am just starting to take pictures of the food I make on this site, so my photos are anything but stellar yet so I will not be offended in any way if you chooses not to use my pictures.
<img src="http://i19.photobucket.com/albums/b158/bella_donata/My%20Art/Recipezaar/goldsparkle.png" border="0" alt="Made by Bella14ragazza">
<a href="http://s19.photobucket.com/albums/b161/tisht/?action=view¤t=tish2.jpg" target="_blank"><img src="http://i19.photobucket.com/albums/b161/tisht/tish2.jpg" border="0" alt="Recipezaar Challenge 2008"></a>
<img src="http://i3.photobucket.com/albums/y53/DUCHESS13/RSC%20Banners/RSC11-Participant.jpg">
<a href="http://s7.photobucket.com/albums/y254/Missymop/?action=view¤t=newtaginethbanner.jpg" target="_blank"><img src="http://i7.photobucket.com/albums/y254/Missymop/newtaginethbanner.jpg" border="0" alt="Photobucket"></a>
<img src="http://i23.photobucket.com/albums/b399/susied214/CV.jpg" border="0" alt="Photobucket"></a>
<img src="http://i23.photobucket.com/albums/b399/susied214/permanent%20collection/Adopted1smp.jpg" border="0" alt="Photo Sharing and Video Hosting at Photobucket">
<img src="http://img.villagephotos.com/p/2003-11/484938/Spelling-Bee-stick2jpg.jpg">
<img src="http://i23.photobucket.com/albums/b399/susied214/permanent%20collection/smPACp.jpg" border="0" alt="Photo Sharing and Video Hosting at Photobucket">
<img src="http://i273.photobucket.com/albums/jj240/marienixon_715/kittencaljpg.jpg">
<img src="http://i19.photobucket.com/albums/b158/bella_donata/My%20Art/Recipezaar/ScrapBook.png" border="0" alt="Made by Bella14ragazza">
<img src="http://i23.photobucket.com/albums/b399/susied214/projects/200_PACpic.jpg" border="0" alt="Photo Sharing and Video Hosting at Photobucket">
<img src="http://i23.photobucket.com/albums/b399/susied214/projects/pacbanner.jpg" border="0" alt="Photo Sharing and Video Hosting at Photobucket">
<img src="http://i19.photobucket.com/albums/b158/bella_donata/My%20Art/ApronSwap2007.jpg" border="0" alt="Made by Bella14ragazza">
<img src="http://i19.photobucket.com/albums/b158/bella_donata/My%20Art/Recipezaar/RedWhiteBlue.jpg" border="0" alt="Made by Bella14ragazza">
<img src="http://i42.photobucket.com/albums/e347/Saturn6666/KiwiDutch/3chefstag1.jpg">
<img src="http://i3.photobucket.com/albums/y53/DUCHESS13/Zaar%20World%20Tour%203/ZWT3-Participation.gif">
<img src="http://www.recipezaar.com/members/home/28636/zwt3banner.jpg">
<a href="http://photobucket.com" target="_blank"><img src="http://i12.photobucket.com/albums/a209/tlonghorn/banners/BBQ2.jpg" border="0" alt="Photo Sharing and Video Hosting at Photobucket"></a>
<img src=http://i21.photobucket.com/albums/b280/carolinamoon21/TasteofYellow.jpg>
<img src="http://i21.photobucket.com/albums/b280/carolinamoon21/Derfcookathon.jpg">