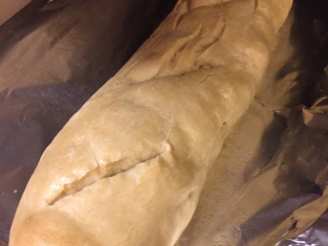
Basic Italian Bread

"The addition of herbs or sun-dried tomatoes easily transforms this basic Italian bread into an extra tasty treat. Prep time includes the time to make the starter and 2 rises."
photo by Dani Jean

- Ready In:
- 9hrs 10mins
- Ingredients:
- 7
- Yields:
-
1 Large loaf
ingredients
-
Biga Starter
- 1⁄2 teaspoon active dry yeast
- 1 cup lukewarm water
- 2 cups unbleached all-purpose flour
-
Bread
- 2 cups water (about 90 F)
- 1 (1/4 ounce) package active dry yeast
- 5 -6 cups unbleached all-purpose flour
- 2 teaspoons salt
directions
- Biga: Mix the yeast and water together, and then slowly start adding the flour, mixing well. Cover with plastic wrap and let sit at room temperature for up to 6 hours, or refrigerate overnight.
- Bread: Place the water in a large bowl, sprinkle the yeast over top and mix well. Let sit 10 minutes until bubbly.
- Add the biga, flour, and salt and stir with a wooden spoon (or mix with your hands) until everything is mixed. The dough will be fairly wet and sticky at this point.
- Cover and let stand in a warm spot for about 1 to 1 1/2 hours until doubled in volume. Punch down the dough, folding it over on itself two or three times, cover and let rise once more until doubled, about 1 hour.
- To bake the following day, refrigerate the dough at this time and leave it overnight.
- Turn out your dough onto a floured baking sheet, and without overworking it too much, shape into one large or two smaller round or oval shaped loaves, using as much extra flour as needed to keep it from sticking. Slash across the tops of the loaves with a serrated knife or razor just prior to baking.
- Preheat the oven to 350° F and place a casserole dish with boiling water on the lower oven rack. Bake for 30 minutes, turn the baking sheet around, and reduce the heat to 300°F and bake for another 30-45 minutes. Bread should be golden brown and should sound hollow when you tap the bottom.
- Allow the bread to cool to room temperature and serve.
- Baking Tip: You could also use a baguette pan to make long thin loaves, or spread your dough across a well-oiled cookie sheet to make focaccia.
- Variations:*Roasted Garlic & Basil Bread: Coarsely chop 1-2 heads (bulbs) roasted garlic and add to flour along with about 1 teaspoon crushed dried basil.
- Rosemary Bread: Add 4 Tablespoons finely chopped fresh rosemary to the flour. Brush the loaves with water and sprinkle with coarse sea salt just prior to baking.
- Olive Bread: Add 12 ounces flavorful, pitted olives, coarsely chopped to the flour.
- *To roast garlic: Heat oven to 350°F Peel away paper like skin from around the garlic bulbs leaving just enough to hold bulb intact. Trim tops of garlic bulbs about 1/2 inch to expose cloves. Place bulbs stem ends down on 12 inch square of foil. Drizzle each bulb with 2 teaspoons olive or vegetable oil. Wrap securely in foil and place in pie plate or shallow baking pan.
- Bake 45 to 50 minutes or until garlic is tender when pierced with toothpick or fork.
- Cool slightly. Gently squeeze garlic out of cloves (1 ounce bulb of roasted garlic= about 1 Tablespoon mashed garlic).
Questions & Replies

Got a question?
Share it with the community!
Reviews
-
 This recipe is fantastic and easy to make. Its also pretty forgiving - I didn't notice that the first 3 times I made it, I didn't put enough water in at the 2nd step! But it still turned out great. My only recommendations for this recipe are to up the amount of salt to 3tsp, and to let the Biga sit on your counter for far longer than 6 hours. The longer it sits, the richer the flavor becomes. I made it yesterday night and let the biga ferment for 11 hours (while I was at work) - it was absolutely unbelievable. I am planning to let it sit for 20 hours next time! Even if you don't increase the salt and the ferment time, its an amazingly easy recipe that turns out great. I highly recommend making this one.
 -
 This was a very plain bread, but that would be perfect to soak up some soup. I made a few small loaves rolled in some herbs in a few while I left one plain. I think next time I make it I'll add some more salt. But a definate five for the hard crust and soft inside with minimal effort.
 -
 Perfect....this is worth the bit of time involved. It produces a crisp crusty bread that is moist & flavorful inside...exactly like the bread I grew up on fron "The Hill" in Providence. The directions are easy & the smell is heavenly as it bakes.
 -
 This bread turned out soft inside with a crispy crust, which I felt was the perfect texture. However, I felt the taste was missing something? I made the plain version and the bread didn't have much flavor. Perhaps adding a little sugar would have done the trick? Next time I try this recipe, I will try a variation as mentioned above.
RECIPE SUBMITTED BY

Dee514
United States
I'm married (53 years to the same lucky guy) and have 2 kids, a daughter 47, a son 43, and 2 beautiful grand daughters (11 yrs and 14 yrs). I have always enjoyed cooking and baking, especially breads :)