Triple Chocolate Petit Fours

"The recipe as written uses chocolate sponge cake, simple syrup, chocolate frosting, and chocolate glaze. The chocolate sponge cake recipe that I used was found here on Recipezaar from Derf and I added some additional guidelines and tips. The chocolate glaze recipe is from AllRecipes.com. Feel free to use the basic outline of the recipe to create your own petit fours. Just use the basic components (sponge cake aka genoise, simple syrup, some sort of filling like frosting/jelly/buttercream/fruit curd, and glaze such as marzipan/fondant/ganache) and follow the assembly instructions given. You can add flavored liquor, coffee, etc to the simple syrup recipe (equal parts sugar and water) to give a little extra flavor."
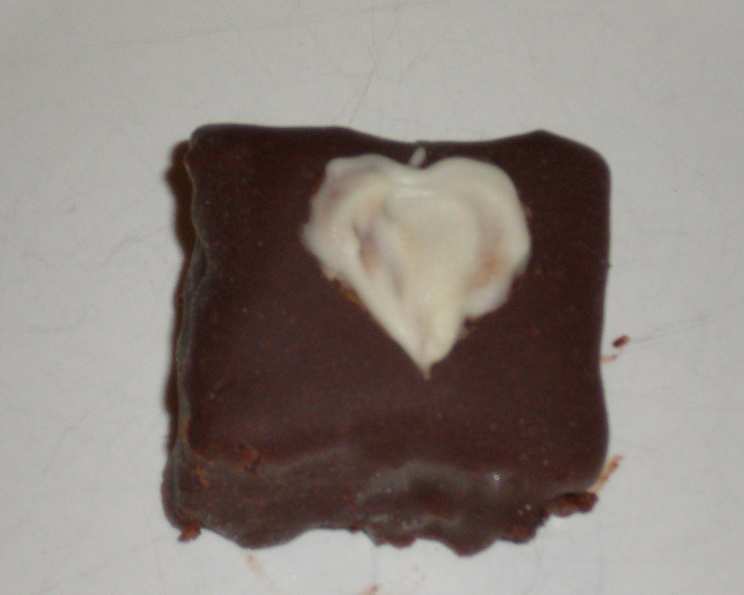

photo by Eat Your Vegetables


- Ready In:
- 1hr 40mins
- Ingredients:
- 17
- Yields:
-
36 petit fours
ingredients
- 1⁄4 cup all-purpose flour
- 1⁄4 cup cocoa
- 4 eggs
- 1⁄4 teaspoon cream of tartar
- 1⁄4 teaspoon salt
- 1⁄3 cup Splenda sugar substitute or 1/3 cup sugar
- 1 teaspoon vanilla
- 1⁄2 cup Splenda sugar substitute or 1/2 cup sugar
- 1⁄2 cup water
- 1 1⁄2 cups powdered sugar
- 1⁄4 cup cocoa
- 3 tablespoons unsalted butter, room temperature
- 1⁄4 teaspoon vanilla
- 16 ounces bittersweet chocolate
- 1 cup unsalted butter
- 2 tablespoons light corn syrup
- 12 white chocolate chips
directions
- Preheat the oven to 325 degrees and spray a 9''x9'' cake pan with non-stick cooking spray.
- In a large bowl, combine the whites only of 4 eggs (reserve 2 of the yolks for later). Try to avoid any 'goldfish' (little bits of yolk in the egg whites). If you do get goldfish, it's okay for this recipe, just realize that you won't get peaks when you beat it.
- Add the 1/4 t cream of tartar and 1/4 t salt to the egg whites. Beat until foamy.
- Add the 1/3 c Splenda/sugar to the egg white mixture and beat until stiff peaks form (or until foamy and well-mixed if you had goldfish).
- Beat in egg yolks and vanilla.
- In a small bowl, mix together the 1/4 c flour and 1/4 c cocoa.
- Lightly fold the flour mixture into the egg mixture.
- Pour batter into prepared cake pan and bake for 25 minutes, or until cake springs back lightly to touch.
- Once the cake is finished baking, turn out onto parchment lined baking rack to cool.
- When the cake is cool, slice into two layers using a long, sharp knife with a serrated blade.
- To make the simple syrup: combine the 1/2 c water and 1/2 c Splenda/sugar in a small saucepan and heat until sugar is dissolved.
- Using a pastry brush, coat both sides of the two cake layers with the simple syrup mixture.
- To make the frosting: cream the 3 T unsalted butter with 1/4 t vanilla. Add the 1 1/2 c powdered sugar and 1/4 c cocoa and blend gently to avoid the powders flying everywhere. CAREFULLY add just enough water to get a thick frosting (caution on this because if you add way too much you'll need to start over with the frosting, it only takes just a little water).
- Spread the frosting over one layer of the cake. Top this layer with the other layer and then frost the top of your layered cake.
- Using your sharp serrated knife again, cut the cake into 36 pieces (5 equal cuts in both directions). To make the pieces perfectly the same size you can measure and insert toothpicks as markers before you cut.
- To make the glaze: In a double boiler, melt the 16 oz bittersweet chocolate, the 1 c unsalted butter, and the 2 T light corn syrup. Stir often until well-blended.
- Set a baking rack over a cookie sheet covered with parchment paper. Set the layered cake pieces on the backing rack with spaces between each piece to let the chocolate flow over their sides.
- Pour the glaze over the cake pieces, taking care to cover the sides. The excess glaze will pool on the cookie sheet and may be reheated and reused. **For less waste, you can half the amount of glaze and coat in two phases, or have another recipe ready to use the excess glaze in.**.
- Allow the glaze to cool. I relocate the baking rack to the freezer to speed up the process once the pieces are slightly cooled.
- For the white hearts decoration: melt the white chocolate chips in a clean double boiler. Once the petit fours are well-hardened, use a clean paintbrush to paint the white chocolate hearts (or whatever decoration you'd like) on the tops. You may need to go over them more than once to get a nice white color without mixing with the dark brown glaze.
Questions & Replies

Got a question?
Share it with the community!
Reviews
-
 I've made this twice, once it was PERFECT and the second time it was definitely not as good. Not sure why the difference, but I do know it was very time intensive and took more concentration than I usually can give to a recipe. I'm keeping the recipe to try again when the kids are older though! Thanks for sharing!!!!
RECIPE SUBMITTED BY

When I was little, I wanted to grow up to be a chef. I grew up to be a doctor instead, but I still love to cook and eat! I especially love recipes that make use of fresh vegetables.
<img src="http://i250.photobucket.com/albums/gg271/MrsTeny/Permanent%20Collection/PACSpring09Iwasadopted.jpg">