Space Mansion Birthday Cake

"We all want the best for our friends, and while buying a mansion for your BFF may be out of your budget, there's no rule that says you can't bake for him/her/it!
I like experimenting and testing the laws of physics and this cake may be the most precarious one I've tried so far! I won't pretend that there weren't a couple fails; a few inedible cheats had to be implemented in order to prevent collapse! That being said, the final product is fully furnished (with sugar) and with a few birthday candles set around it, it's ready to impress!
Explaining how to assemble this is tricky without writing a novel! Remember your components should all be VERY cold (work out of the fridge directly as much as possible). Build your stand first and make sure it can fit easily in the fridge. Make sure any components that touch food are non-toxic. I built the bottom stand entirely out of non-edible parts and set the cake on it before photographing."
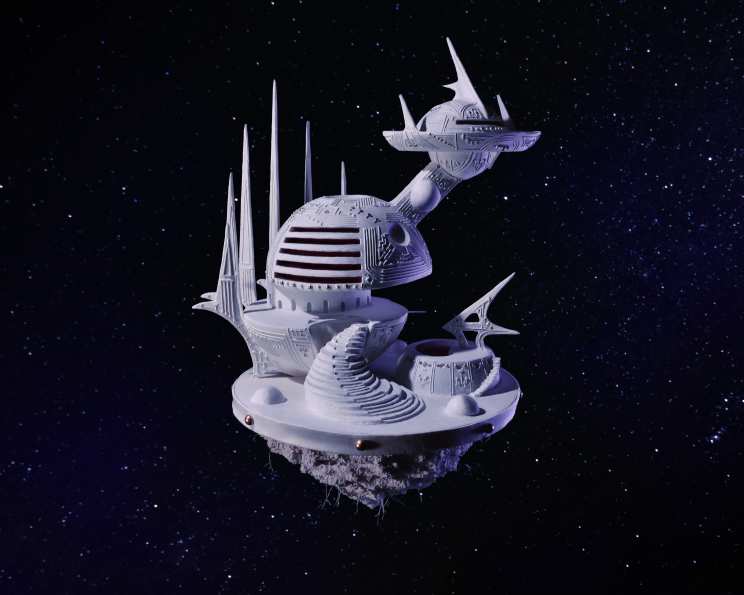

photo by ChristineMcConnell


- Ready In:
- 27hrs
- Ingredients:
- 27
- Serves:
-
35
ingredients
-
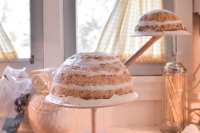
Birthday Cake
- 15 egg whites
- 2 cups whole milk
- 6 teaspoons clear vanilla extract
- 3 cups all-purpose flour
- 3 cups cake flour
- 2 tablespoons baking powder
- 2 teaspoons salt
- 2 cups unsalted butter
- 4 cups granulated sugar
- 1⁄2 cup funfetti candy sprinkles
-
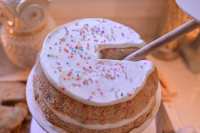
Birthday Cake Buttercream
- 1 cup butter
- 3 cups confectioners' sugar
- 2 tablespoons heavy whipping cream
- 2 teaspoons clear vanilla
- 1 teaspoon salt
- 2 tablespoons funfetti candy sprinkles
-
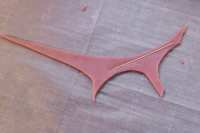
Pink Sugar cookie supports and embellishments
- 1⁄4 teaspoon salt
- 1 cup softened butter
- 1 cup sugar
- 1 large egg
- 1 tablespoon milk
- 3 cups all-purpose flour
- pink food coloring
- powdered sugar, for rolling out dough
- toothpick, for added support
-
Royal icing
- 3 large egg whites
- 4 cups confectioners' sugar
directions
- Assemble your cake stand and the following tools: Cakeboards, Wooden and metal rods, Toothpicks, Hot glue gun, Drill, Wooden discs for main supports, Isolamalt and pink food coloring to fill the pool, Level.
- Arrange your discs and boards how you like. Cut wooden rods and drill appropriate holes. Only use the hot glue to stabilize the top parts, but try to use metal rods to secure the lower stand as it's the place that supports the most weight. Seal any metal that could touch food in non-toxic hot glue. Use a level to make sure everything is straight and balanced, and test the weight on your platforms with books and weights to ensure that it can support the cake's weight.
-
For the Birthday Cake:
- Heat your oven to 350°F Mix egg whites, milk and clear vanilla in glass bowl. Mix cake flour, all-purpose flour, salt and baking powder in a separate bowl. Cream butter in a stand mixer, add sugar and beat until light and fully incorporated. Add funfetti sprinkles last.
- Butter and flour two large domed baking pans and two smaller domed baking pans. Alternate mixing the wet and dry ingredients into the butter batter until all are fully incorporated. Pour into trays and bake the larger domes about 50 minutes minutes and smaller domes about 35 minutes until a toothpick comes out clean. Wait ten minutes before removing from tins. Wrap and chill.
-
For the Birthday Cake Buttercream:
- In a stand mixer, beat room temperature butter until fluffy. Add icing sugar one cup at a time. Add whipping cream, salt (add funfetti / birthday confetti). Whip and frost cake.
-
For the Pink Sugar Cookie Supports and Embellishments:
- In a stand mixer, beat butter, sugar, salt, egg and milk. Slowly incorporate flour until a dough ball forms. Split into two balls and chill until ready to use.
- Heat oven to 375F and roll out dough onto a parchment lined baking sheet using powdered sugar to prevent sticking. Cut out shapes using homemade stencils made out of card stock and save scraps for the next batch. Bake 9 to 11 minutes until edges just begin to brown. Remove from oven and smooth by placing parchment paper over the top of freshly baked cookies and press down flat with a slightly smaller baking sheet. Once cool place on paper towel to absorb any butter before assembling.
- I used toothpicks at the base of some of these for added strength, so make sure your guests are aware of that. These cookies were all attached using royal icing and allowed to dry and set for several hours at a time.
-
For the Royal icing:
- Beat egg whites until frothy. Add a cup of powdered sugar at a time until incorporated. Once mixed place in a pastry bag and pipe. Use this as your 'glue' for cookies, as well as a solid coat over your domes and cookies, then as a final touch for electronic-looking embellishments.
Questions & Replies

Got a question?
Share it with the community!
Reviews
Have any thoughts about this recipe?
Share it with the community!
RECIPE SUBMITTED BY

ChristineMcConnell
United States
Artist, photographer, baker and author of Deceptive Desserts