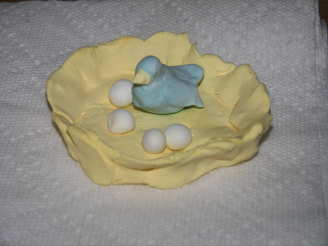
Soda Play Clay

"This is great fun. I know that soda clay is a well known recipe, here are mainly some more ideas to use it, ornaments, fridge magnets, jewelry or gift labels. Years ago my mother-in-law gave me the most horrible box with twenty different colors of eyeshadow bright pinks, blues and even yellow shades. I almost threw it in the bin, but felt I could not do that. I use it now for many craft projects and it works wonderful on this clay."
- Ready In:
- 15mins
- Ingredients:
- 4
- Yields:
-
1 batch play clay
ingredients
- 2 cups baking soda
- 1 cup cornstarch
- 1 1⁄3 cups water
- 1 teaspoon vegetable oil (optional)
directions
- Optionals: rubber stamps; ink pads; use different colored pads for a rainbow effect; shallow plastic plaster mold (s), small Christmas figurines/ornaments; flowers or fruits for magnets, brooches or earrings; cookie stamps; craft paints; eyeshadow; magnets; fittings for earrings or brooches; glitter; ribbon/string; glue.
- In a pan mix the baking soda with the cornstarch.
- Add the water and the oil, keep stirring and cook until thickened and it looks like you have mashed potatoes in the pan, usually after 5 minutes up to 10 minutes on a low heat.
- Remove from the heat and cool.
- Knead the clay, it should not be sticky, if too dry add a bit more water, too wet add some cornstarch, put in a plastic bag.
- Super easy is to roll it out and cut out shapes with a cookie cutter, pierce a hole in the top.
- Rubber stamps: ink the stamp, roll out the clay,very gently stamp into the clay,if you do this too hard it will definitely crack during drying, with a small knife cut away around the stamp impression, flatten rough edges gently with your fingers.
- Use a spatula to lift onto baking tray lined with kitchen paper, to let it dry, don;t forget the hole in the top.
- When dry you can still paint it if you want too.
- Plaster molds: use enough clay to fill the mold, use your rolling pin to even it out, it should go over the edges of the mold, carefully and gently ease the clay out of the mold, sometimes a thin knife helps to give you a grip on the clay.
- When out of the mold trim with a knife and smooth the edges with your fingers.
- Again let it dry, for ornaments pierce the hole in the top, leave plain for kitchen magnets or earrings and brooches.
- Cookie stamps: Use like stamps but without the ink for a nice embossed look.
- You can finish them when they are dry with craft paints and you get a beautiful result using eyeshadow with a soft brush almost a water color effect, blusher works too.
- For an old/antique look, brush on antiquing medium,wipe off with a soft cloth right away, take in mind that there are water and oil based mediums and they will have to be used different so read directions first and try it out first on the back of your clay object and you might have to varnish it before you can use the medium.
- If you want to use glitter, brush a thin layer of glue on the area, sprinkle with the glitter shake of the excess glitter.
- Drying time depends on the thickness, keep an eye on them and turn them over during the drying process.
- Leftover clay keeps for a few days in the fridge, keep it in the bag, personally I prefer it kept outside the fridge.
- I do find that when the weather is hot and humid, it seems to crack more during the drying process.
Questions & Replies

Got a question?
Share it with the community!
Reviews
-
 I've made this one before and had loads of fun doing it for gift giving. I did use more water though(for 1 cup baking soda and 1/2 cup cornflour, i used 3/4 cup of water). I did not use oil at all. I made use of food colouring to make different coloured ornaments. I pinched off balls of the coloured dough and flattened them in my palm. Then, I made faces(eyes, ears, nose and mouth.) for each ball using things like cloves, cumin seeds, cardamom seeds, green cardamoms, whole black peppercorns and various lentils. These were very pretty, I took the liberty of calling them "my little men of clay";-) Once I'd made them, I put them on an aluminium sheet on a tray and placed them in my freezer. They were rock solid and dry the next day. The kids I gave them to as gifts simply loved them(both, big and small) :-)
 -
 I only had enough ingredients on hand to make a 1/2 batch of this & a 1/2 batch of "salt clay". This clay turned out so much better than the salt clay! The dough is much easier to work with & the finsihed product looks so much nicer. It has a smooth snowy-white finsih. My projects have not completely dried yet, but so far this recipe beats the salt clay hands down :). Thank u!
 -
 Wonderful clay!
 -
 I made this recipe and put my sons foot and hand prints on them. He then decorated them. It will be an awesome fathers day present and birthday present. I think we will do this agiain for christmas presents and ornaments as well. Thanks for the recipe.
 -
 This was the nicest clay I have found out of which to make Christmas ornaments. It feels so nice as you work with it and the white color is so pretty. Yes we will paint them, but still so very nice white. It stuck together better then most other clays I have used to make ornaments. The kids and I had a wonderful time!
RECIPE SUBMITTED BY

PetsRus
Leiden, Zuid Holland
Hello, my name is Bonnie and I am a very beautiful cat as you can see if you look at the picture at the top of this page.... What??.. I am supposed to talk about you??? But it says here: About Me!! Well all right then ......
My mom is Dutch and has moved to England in October 2007, after living 15 years in the Netherlands with my English dad. They don’t have any human children and “created” their own family, which means I have to share them with Hannah, she is a 6 years old tortie cat, Abby the dog, she is a 9 year old Beagle, and a one year old black Miniature Pincher named Poppy, I refuse to tell you my age but I am a georgious lilac British Shorthair cat!!
It is obvious she adores pets just by looking at her name she uses on Zaar (many on Zaar call her Pets or Petsie Poo), her name in real life is Annelies and that is a common Dutch name.
My mom always liked to cook, but since she joined Zaar it got out of control, and it doesn’t help that she is disorganized. Printed recipes everywhere in the house, the recipe binders have got bigger and just between you and me, her hips too!!!
I have lived in Holland all of my life until now, but they lived in several different countries/places:- desert and coastal Oman, up North and West in Holland, Vancouver-Canada, Aberdeen- Scotland and in Norway they lived in Bergen and Oslo. We have all moved together to England, as you can see I’ve already learnt the language!
I heard her say to Dad that this is the last time she moved to another country...she's had it with moving from one place to another! ( its her age...she's getting grumpy)
Mom is 55 years old but I always hear her say that the date of her birthday does not mean that much to her, the date of her cancer anniversary is more important, because so far she is a survivor.
Besides cooking she has other interests too, crafts, gardening and soap making.
She likes Zaar and is one of the hosts on the German-Benelux Forum here on RecipeZaar.
She would like to thank everybody who tries and comments on the recipes she has posted on Recipezaar, your feedback is very much appreciated.
<img src="http://i6.photobucket.com/albums/y227/vjuhl/MEPcookathon.jpg">
<img src="http://i3.photobucket.com/albums/y53/DUCHESS13/berriesblinkie.gif" alt="Image hosted by Photobucket.com">
<img src="http://i3.photobucket.com/albums/y53/DUCHESS13/FFF/completedbanner.gif">
<img src="http://i3.photobucket.com/albums/y53/DUCHESS13/Animation1.gif" alt="Image hosted by Photobucket.com">
<img src="http://i3.photobucket.com/albums/y53/DUCHESS13/4treasurehunt.gif">
<img src="http://i23.photobucket.com/albums/b399/susied214/purplechefhat.gif" alt="Image hosted by Photobucket.com"> <img src="http://i23.photobucket.com/albums/b399/susied214/projects/chef3.jpg" alt="Image hosted by Photobucket.com"><a href="http://photobucket.com" target="_blank">
<img src="http://i23.photobucket.com/albums/b399/susied214/beartag_1_1.jpg" border="0" alt="Photobucket - Video and Image Hosting"></a><a href="http://photobucket.com" target="_blank"> <img src="http://i23.photobucket.com/albums/b399/susied214/adopted_1_1.jpg" border="0" alt="Photobucket - Video and Image Hosting"></a>