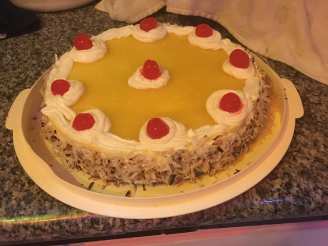
Pina Colada Cheesecake With Coco-Nut Crust

"Made this cheesecake only once, quite a few years ago, but remember it as "sumptuous"!! The perfect dessert - 1985"


- Ready In:
- 1hr 40mins
- Ingredients:
- 12
- Serves:
-
8-10
ingredients
-
Coco Nut Crust
- 1 1⁄2 - 2 tablespoons butter, at room temperature
- 1 cup flaked coconut
- 1 cup ground toasted brazil nuts or 1 cup ground toasted filbert nut
- 1⁄4 cup sugar
- 1⁄4 cup butter, melted, cooled to room temperature
-
Cheesecake
- 2 1⁄4 lbs cream cheese, at room temperature
- 3⁄4 cup unsweetened crushed canned pineapple, drained well, 1/2 cup juice reserved
- 1⁄3 cup coconut rum
- 1⁄4 cup sour cream
- 1 1⁄2 cups sugar
- 4 large eggs, at room temperature, slightly beaten
- 2 slices fresh pineapple, 1/2 cm thick (optional) or 2 slices canned pineapple (optional)
directions
- Prepare coco nut crust.
- Place oven rack in centre of oven, heat to 350 degrees.
- Coat bottom and sides of 9 inch springform pan evenly with unmelted butter, reserve.
- Stir coconut, Brazil nuts and sugar in medium bowl.
- Drizzle melted butter over nut mixture.
- Stir and toss mixture vigorously with fork until slightly darkened and uniform.
- Press nut mixture evenly on sides and bottom of reserved pan.
- Refrigerate 5 minutes.
- Bake crust 7 minutes.
- Cool on wire rack to room temperature before filling, about 30 minutes.
- Cheesecake-------------.
- Place oven rack in centre of oven, heat to 350 degrees.
- Cut cream cheese into 1 inch cubes, place in large mixer bowl.
- Beat at medium speed, scraping down sides of bowl as needed, until completely smooth.
- Continue beating while gradually adding crushed pineapple.
- Gradually beat in reserved pineapple juice and the liqueur until blended, scraping down sides of bowl as needed.
- Add sour cream to cheese mixture, beat at medium speed until blended.
- Continue beating while very slowly adding sugar, scraping down sides of bowl as needed, beat until sugar is absorbed.
- Add eggs, about 1/4 cup at a time, beating well and scraping down sides of bowl after each addition.
- (Batter will be thin) Pour patter into baked cooled coconut crust.
- Gently rotate pan several quarter turns to settle batter.
- Bake until sides of cheesecake are set 2 1/2 inches in from edges and centre is still pudding like, 60 to 65 minutes for a creamy centre.
- For a firmer centre, bake until centre is just set, about 10 minutes longer (cake may crack at sides).
- transfer pan to wire rack away from drafts.
- Let cool undisturbed until sides and bottom of pan are completely cooled to room temperature.
- Remove sides of pan.
- Refrigerate cake uncovered overnight or at least 8 hours.
- Cover cake loosely with plastic wrap, refrigerate until serving time.
- Make optional garnish just before serving.
- Pare and core pineapple slices, cut out eyes of pineapple making small notches in outer edge of slices (or use canned slices).
- Cut slices into quarters.
- Place 6 to 8 pineapple quarters in border around top of cheesecake.
Questions & Replies

Got a question?
Share it with the community!
Reviews
-
 I recently served this cheesecake at a dinner party. It was a hit. I have been giving out the receipe. I do cook my cheesecakes a little differrently. I cook my cheesecakes in a water bath. Place the cheesecake in the oven in a water bath at 350 degrees and bake for one hour. Then, leave the cheesecake in the oven in the water bath, turn the oven off and let the cheesecake sit in the oven for one hour. Take cheesecake out of the oven and run a knife around the edge of the cheesecake to loosen from the springform pan. Let cheesecake cool for a couple of hours on a wire rack. Cover the cheesecake and put it in the refrigerator to cool. Take the cheesecake out of the refrigerator and remove the springform pan before serving. I made a pineapple sauce and served it on the side. Puree fresh pineapple then chop a little pineapple up and stir it into the puree. The sauce is great. What an excellent cheesecake!
 -
 Dorothy, you should make this again! Thanks for an easy to follow recipe for a first-time baked cheesecake cook. I followed your detailed instructions faithfully to end up with the most wonderful dessert that our guests raved over. I didn't garnish the cheesecake as it looked good as it was, but served it with a tropical fruit platter. Thanks.
 -
 I had set this recipe aside to try but was a little intimidated by the number of steps. When a friend offered to bring a dessert to a recent dinner party in my home, I gave him the recipe, as he is an excellent, fearless cook! (He said it was quite easy to make.) Well, this dessert was fabulous and got rave reviews. Several cheesecake lovers said it was the best they had ever had. Thanks for sharing this outstanding recipe!
 -
This ought to be on the Hall of Fame!! It is TDF!! So simple to make, and the instructions so detailed and well written!! BUT! Not as fantastic as the cheesecake! now people who haven't tried it...have a look at how simple the directions are, try it!! You won't regret it. It is really outstanding!! Though my mixer had a hard time with the mixture for the cheese filling. It really is very thin. Don't worry. My cheesecake only took 35 minutes to get done. And oh goodness...really not a single blemish...no crack in sight, I didn't even need to bake it in a waterbath!! And I was in a rush, I took it straight out of the oven once it was ready instead of allowing it to cool in the oven slowly. Still the cheesecake held up very well and no cracks. Seriously guys, try this recipe...i didn't change it one bit and it was oh so so so so so GOOD!!!!!
-
Pineapple, coconut and brazil nuts you hooked me:) This is so good, Thank for sharing.
see 2 more reviews
RECIPE SUBMITTED BY

<p>November 4th, 2013: Our community lost a wonderful friend when Dorothy passed away on October 24th, 2013. We are shocked and saddened by her passing and there is a thread for expressing your condolences.</p>
<p>Mary at Food.com</p>
<p><a href=http://www.food.com/bb/viewtopic.zsp?t=398284>http://www.food.com/bb/viewtopic.zsp?t=398284</a></p>
<p> </p>
<p>********************************************************************</p>
<p>I live in the sunny okanogan valley - I am a retired Resort Services Director, love collecting receipes and cooking but am a diabetic so some times i can only collect </p>
<p>Love traveling, own a timeshare, went to Portugal in the year 2000, this picture was taken there, so it's 9 years old, but the only decent one I have, I am not photogenic and hate having my picture taken!! <br />I've been enjoying lushious recipes from 'zaar for 9 years now, since January 2001. <br /><img src=http://i3.photobucket.com/albums/y53/DUCHESS13/Animation1.gif alt=Image hosted by Photobucket.com /> <img src=http://i3.photobucket.com/albums/y53/DUCHESS13/berriesblinkie.gif alt=Image hosted by Photobucket.com /><img src=http://i3.photobucket.com/albums/y53/DUCHESS13/4treasurehunt.gif alt=Image hosted by Photobucket.com /> <br /><img src=http://i23.photobucket.com/albums/b399/susied214/purplechefhat.gif alt=Image hosted by Photobucket.com /><img src=http://i23.photobucket.com/albums/b399/susied214/projects/chef3.jpg alt=Image hosted by Photobucket.com /> <br /><br /><img src=http://i23.photobucket.com/albums/b399/susied214/projects/FinishedJollyRoger_1.jpg border=0 alt=Image hosting by Photobucket.com /><img src=http://i23.photobucket.com/albums/b399/susied214/projects/dragonspearls_1.jpg border=0 alt=Image hosting by Photobucket /><img src=http://i3.photobucket.com/albums/y53/DUCHESS13/FFF/completedbanner.gif alt= /> <br /><img src=http://i23.photobucket.com/albums/b399/susied214/permanent%20collection/untitled.jpg border=0 alt=Photobucket - Video and Image Hosting /> <img src=http://i23.photobucket.com/albums/b399/susied214/permanent%20collection/200_artistrichardneuman-art-prints_.jpg border=0 alt=Photobucket - Video and Image Hosting /><img src=http://i23.photobucket.com/albums/b399/susied214/projects/pacbanner.jpg border=0 alt=Photo Sharing and Video Hosting at Photobucket /><img src=http://i23.photobucket.com/albums/b399/susied214/projects/200_PACpic.jpg border=0 alt=Photo Sharing and Video Hosting at Photobucket /><img src=http://i21.photobucket.com/albums/b280/carolinamoon21/TasteofYellow.jpg alt= /><img src=http://i21.photobucket.com/albums/b280/carolinamoon21/Octoberevent.jpg alt= /><img src=http://www.recipezaar.com/members/home/1535/cheesesticker.jpg alt= /><img src=http://i21.photobucket.com/albums/b280/carolinamoon21/personal/FRENCH-foodfun.jpg alt= /><img src=http://i21.photobucket.com/albums/b280/carolinamoon21/EditBeforeandAfterSTICKER.jpg alt= /><img src=http://i42.photobucket.com/albums/e347/Saturn6666/Banners/Photo_Video_577111733_orig.jpg alt= /><img src=http://img.villagephotos.com/p/2003-11/484938/Spelling-Bee-stick2jpg.jpg alt= /><img src=http://www.recipezaar.com/members/home/1956/holidaylightssticker.jpg alt= /><img src=http://img.photobucket.com/albums/v204/derf16/food%20photography%20series/Comfortstickercopysmall.jpg alt= /><img src=http://i21.photobucket.com/albums/b280/carolinamoon21/Ingredients/Other/photo-swap-7sticky.jpg alt= /><img src=http://img.photobucket.com/albums/v204/derf16/food%20photography%20series/MuffinLovesticker.jpg alt= /><img src=http://www.recipezaar.com/members/home/1956/L%5B1%5D.F-stickJPEG.jpg alt= /><img src=http://img.villagephotos.com/p/2003-11/484938/MayFlowerssticker.jpg alt= /><img src=http://i21.photobucket.com/albums/b280/carolinamoon21/Ingredients/TasteofYellowSTICKER.jpg alt= /><img src=http://i21.photobucket.com/albums/b280/carolinamoon21/Ingredients/BBQlSTKR.jpg alt= /><img src=http://i21.photobucket.com/albums/b280/carolinamoon21/Ingredients/CobblerPieTartSTICKER.jpg alt= /><img src=http://i21.photobucket.com/albums/b280/carolinamoon21/Ingredients/CROCKPOTSTKR.jpg alt= /><img src=http://i21.photobucket.com/albums/b280/carolinamoon21/Ingredients/FISHSEAFDSTICKER.jpg alt= /> <br /><br /><img src=http://i80.photobucket.com/albums/j166/ZaarNicksMom/CookingSchoolHost1.jpg border=0 alt=Photobucket /><img src=http://i21.photobucket.com/albums/b280/carolinamoon21/Ingredients/Other/BeyondburgersST.jpg alt= /><img src=http://i21.photobucket.com/albums/b280/carolinamoon21/Ingredients/Other/Elves-appreciationSTICKER.jpg alt= /></p>