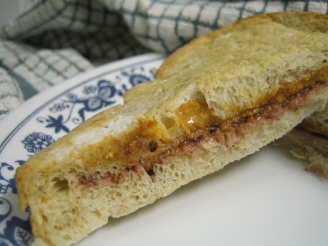
Peanut Butter and Jelly Bread

"Yummmm.. :) I don't even remember where I got the idea for this, but I was on a bread kick for a while and kept inventing. This one was actually a success... I'm thinking of making another loaf tomorrow actually. hehe. Tasty stuff."


- Ready In:
- 4hrs
- Ingredients:
- 12
- Yields:
-
1 loaf
- Serves:
- 10
ingredients
- 3 cups bread flour
- 4 teaspoons vital wheat gluten
- 1⁄2 cup water (~110 degrees F)
- 2 3⁄4 teaspoons active dry yeast
- 1⁄2 cup milk
- 1 1⁄2 teaspoons salt
- 1 egg (beaten)
- 1 tablespoon peanut butter
- 1 tablespoon jelly, plus more
- jelly, for rolling in
- 2 teaspoons butter
- 1 teaspoon honey
directions
- Heat milk and butter in small saucepan until butter melts.
- Cool until warm (about 110 degrees F).
- Mix flour, salt, and vital wheat gluten in a medium bowl and set aside.
- Mix yeast, water, and honey together and let proof.
- Add egg and mix well.
- Then, stir in warmed milk mixture.
- Add 2 cups of the flour mixture to wet ingredients.
- Mix well, then add PB and Jelly.
- Knead in remaining flour, a little at a time until it reaches the right consistency. (you probably won't use all of the leftover flour).
- Lightly oil a large bowl and place the dough ball in the center.
- Cover, and set aside to rise until tripled in bulk (about 2 hours or so I think?).
- Once risen, turn out onto a flat, lightly floured surface, and gently pat into a rectangle shape about 1.5 inches thick and as wide as the loaf pan.
- Spread a layer of jelly over the surface of the dough, and roll it up like a standard loaf bread, tucking the ends under.
- Place in a greased loaf pan, and cover, allowing to rise until doubled in bulk, The surface should be rounded above the rim of the pan.
- Once risen for the second time, adjust your oven racks to the lowest and middle levels.
- Place a roasting pan on the bottom rack.
- Boil 2 cups of water and pour the water into the pan on the bottom rack, quickly placing the loaf pan on the middle rack.
- Bake at 350 degrees F for about 40-50 minutes (until an instant read thermometer reads about 195 degrees.).
- Remove the bread from the pan and allow to cool to room temperature on some parchment paper on a wire rack. (so the jelly doesn't slime up your bakers rack).
- Slice and enjoy! :D.
Questions & Replies

Got a question?
Share it with the community!
Reviews
Have any thoughts about this recipe?
Share it with the community!
RECIPE SUBMITTED BY

Hi there! I'm a 26 year old blissfully married wanna-be music teacher. I'm still applying for jobs and doing the substitute thing, so I've had some time recently to be a bit more experimental in the kitchen. I'm a total dork, and I spend most of my free time either baking, working out at the Y, or lazing the day away online on Final Fantasy XI... :D Nice to meet you!
<img src="http://i23.photobucket.com/albums/b399/susied214/permanent%20collection/untitled.jpg" border="0" alt="Photobucket - Video and Image Hosting"> <img src="http://i23.photobucket.com/albums/b399/susied214/permanent%20collection/200_artistrichardneuman-art-prints_.jpg" border="0" alt="Photobucket - Video and Image Hosting">