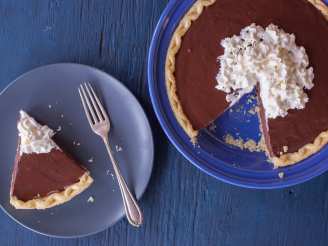
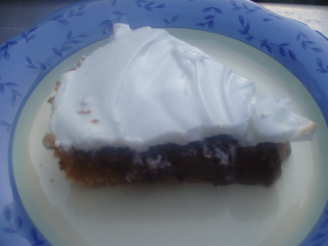
Chocolate Cream Pie With Cookie Crumb Crust

"A little more complicated than my usual chocolate pie but so good! Originally found in Woman's Day magazine many years ago."
- Ready In:
- 1hr
- Ingredients:
- 13
- Yields:
-
1 pie
ingredients
-
Crust
- 1 1⁄3 cups vanilla wafers, finely crushed (abt 34 cookies)
- 2 tablespoons sugar
- 1⁄2 teaspoon vanilla
- 5 tablespoons butter or 5 tablespoons margarine, melted
-
Filling
- 1 cup sugar
- 2 tablespoons flour
- 2 tablespoons cornstarch
- 1⁄2 teaspoon salt
- 3 cups milk
- 3 egg yolks
- 4 ounces unsweetened chocolate squares
- 3 tablespoons butter or 3 tablespoons margarine
- 2 teaspoons vanilla
directions
- Heat oven to 350ºF.
- Have a 9 inch pie plate ready.
- Crust: Mix cookie crumbs, sugar and vanilla in a bowl.
- Stir in melted butter until crumbs are evenly coated.
- Press evenly over bottom and up sides of pie plate.
- Bake 8 minutes or until set.
- Cool completely on a wire rack.
- Filling: Mix sugar, flour, cornstarch and salt in a medium size saucepan.
- Whisk in 1 cup of the milk until smooth.
- (Make sure whisk reaches inside bottom edges of saucepan.) Whisk in remaining 2 cups milk.
- Bring to a gentle boil and cook over medium heat, whisking constantly, 9-10 minutes until thick.
- Remove from heat.
- Whisk egg yolks in a medium size bowl.
- Whisking constantly, gradually add about 2 cups hot-milk mixture to yolks.
- Pour this back into saucepan and simmer 2 to 3 minutes, whisking constantly, until slightly thicker.
- Remove from heat.
- Add chocolate, butter and vanilla and stir until chocolate and butter melt.
- Pour into a bowl.
- Place plastic wrap or waxed paper directly on surface to prevent skin from forming.
- Let cool about 30 minutes.
- Stir filling, then pour into prepared crust.
- Cover as before and refrigerate until set, at least 2 hours or up to 3 days.
- Just before serving, garnish with whipped cream and sprinkle by stirring it through a strainer.
Questions & Replies

Got a question?
Share it with the community!
Reviews
-
 Am not giving stars at this point as I only used the recipe for the crust. I used animal crackers instead of wafers and next time will double to get all the way up the sides of the pie plate.
Tweaks
-
Am not giving stars at this point as I only used the recipe for the crust. I used animal crackers instead of wafers and next time will double to get all the way up the sides of the pie plate.
RECIPE SUBMITTED BY

Nancy G.
Chesapeake, VA
<p>Thank you to everyone who has tried one of my recipes and for all the great reviews.</p>
<p>I just passed over 1 million views on my blog ~ thank you everyone!!<br /> <br /><a id=clustrMapsLink href=http://www4.clustrmaps.com/counter/maps.php?url=http://nancysrecipes.wordpress.com><img id=clustrMapsImg title=Locations of visitors to this page src=http://www4.clustrmaps.com/counter/index2.php?url=http://nancysrecipes.wordpress.com alt=Locations of visitors to this page /> <br /></a> <br /> <br /> <br /> <br /> <br /> <br /> <br /> <br /><img src=http://i3.photobucket.com/albums/y53/DUCHESS13/berriesblinkie.gif alt=Image hosted by Photobucket.com /> <img src=http://img.photobucket.com/albums/v227/nancycg56/pickachef05.gif alt=Image hosted by Photobucket.com /> <img src=http://i23.photobucket.com/albums/b399/susied214/projects/chef3.jpg alt=Image hosted by Photobucket.com /><img src=http://i23.photobucket.com/albums/b399/susied214/projects/untitled_1.jpg border=0 alt=Image hosting by Photobucket /><img src=http://i3.photobucket.com/albums/y53/DUCHESS13/FFF/completedbanner.gif alt= /> <br /><img src=http://i23.photobucket.com/albums/b399/susied214/beartag_1_1.jpg border=0 alt=Photobucket - Video and Image Hosting /><img src=http://i23.photobucket.com/albums/b399/susied214/adopted_1_1.jpg border=0 alt=Photobucket - Video and Image Hosting /><img src=http://i23.photobucket.com/albums/b399/susied214/permanent%20collection/untitled.jpg border=0 alt=Photobucket - Video and Image Hosting /> <img src=http://i23.photobucket.com/albums/b399/susied214/permanent%20collection/200_artistrichardneuman-art-prints_.jpg border=0 alt=Photobucket - Video and Image Hosting /><img src=http://i23.photobucket.com/albums/b399/susied214/projects/200_PACpic.jpg border=0 alt=Photo Sharing and Video Hosting at Photobucket /> <img src=http://i23.photobucket.com/albums/b399/susied214/projects/pacbanner.jpg border=0 alt=Photo Sharing and Video Hosting at Photobucket /> <img src=http://i23.photobucket.com/albums/b399/susied214/permanent%20collection/Adopted1smp.jpg border=0 alt=Photo Sharing and Video Hosting at Photobucket /><img src=http://i23.photobucket.com/albums/b399/susied214/permanent%20collection/smPACp.jpg border=0 alt=Photo Sharing and Video Hosting at Photobucket /><img src=http://i42.photobucket.com/albums/e347/Saturn6666/Banners/Photo_Video_577111733_orig.jpg alt= /><a href=http://smg.photobucket.com/albums/v227/nancycg56/?action=view&current=freezertagchallenge2007.jpg target=_blank><img src=http://img.photobucket.com/albums/v227/nancycg56/freezertagchallenge2007.jpg border=0 alt=Photobucket /></a><img src=http://i23.photobucket.com/albums/b399/susied214/permanent%20collection/PAC08Main.jpg border=0 alt=Photobucket /><img src=http://i23.photobucket.com/albums/b399/susied214/permanent%20collection/adoptedspring08.jpg border=0 alt=Photobucket /> <br /><img src=http://i21.photobucket.com/albums/b280/carolinamoon21/Ingredients/Other/BreakfastanytimeSTCK.jpg alt= /> <br /><img src=http://i23.photobucket.com/albums/b399/susied214/permanent%20collection/PACfall08partic.jpg border=0 alt=Photobucket /> <br /><img src=http://i23.photobucket.com/albums/b399/susied214/permanent%20collection/IWasAdoptedfall08.jpg border=0 alt=Photobucket /> <br /><img src=http://i6.photobucket.com/albums/y227/vjuhl/MEPcookathon.jpg alt= /></p>